Thursday, 28 February 2013

CNR London Yard - 1994

An early morning view of the CNR London, Ont. yard on February 27, 1994. The south yard seen to the right if full.
A Cold February Morning
During the time this photo was taken I was working on the engineman's spare board. On this particular morning, Feb. 27, 1994 I was called for the regularly run Sunday morning extra yard. I arrived early and had crossed the Highbury Ave. overpass were I could check the yard on my way to work. If the yard is full I knew we were in for a long day. On this day it was full. I noted the fresh snow and the alignment of the engines and caboose in the south yard. I did have my camera with me and thought it would make a nice view. I decided to go part way up the bridge and record this view. The small engine seen to the left is the yard engine we would use to switch the yard. Our yard office is to the left of that. One can see two leads. The five tracks full of cars to the right is the south yard. The empty tracks right of the south yard are the two main lines.

The south yard was were trains would be yarded and switched in most cases although the two tracks to the left of the south yard are the longest and are also used for arriving trains. In the photo we are looking west. One can see three westbound trains are stored waiting switching. Two of these would be road switchers trains that had arrived through the night.The road power seen is on an Eastbound train which would be ready to go once the crew is ordered. Our crew would have to ready all the Toronto bound cars before it could be ordered. Those days are now long gone as one never sees a caboose in London yard and there is only one through train and a few road switchers working out of London....George Dutka


Monday, 25 February 2013

RailroadKITS - Fisher Fuel

The three components that make up Fisher Fuels.

Fuel dealer for the White River Division

The last two posts we looked at the fuel tank, now lets take a look at the main structure for the kit. The instructions can be found on line. I am not going to cover the entire kit's construction, just what I think might help one come up with a better model. I used almost all the included material other than the roofing which I changed out. I began by adding rows of nail holes with a pin. I also pulled up a few boards to give it a more run down appearance. In hind site I should have pulled more boards up...check out Don's review...he did a much better job of that. The walls are glued together per instruction although I added a lot more bracing as the wood tends to warp over time. The kit gives you much more supporting than one needs so use it. In past RailroadKITS projects I used the square corners included with the kits. I never seem to get a properly finished corners. I did not use these corners, I just glued the walls together and added some Northeastern 1" x 8" trim pieces on the corners.

The windows and doors fit in nice and snug. The rafters also fit in nicely and are easy to trim once the roof is applied. All in all the kit is a very nice model to build. The glazing used in the sheds windows got a coat of Floquil flat finish for a dirty look. The office got the cleaner windows.

The shed door are completed and stained with Hunterline weathering finish. The rafters are also finished the same. In the kit the supports for the doors are rather thick. I used scale 1" thick lumber which looks much better although it is not prototypical correct. The corner trim and trim added around the doors is the same size stripwood as used for the door supports giving the structure a unified appearance.

The shed is complete while the roof and rafters are still to be added to the office.
 Roofing
The office building shingles are by Branchline. They are leftover black shingles that are found in the Crosby Coal Kit. They are glued on style. I used about four different Bragdon powders on the roofing. I just touched areas with different colours than rubbed it all in. I finished with some streaks of soot and dark gray. For the shed I used BEST roll roofing in black. I gave it a heavy coating of soot powders with a slight mix of dark rust added. This I rubbed in with my fingers.

One can see all the stipwood has had Hunterline stain added. The chalk and Bragdon powders used are also seen in this view.

Wall and detail Colouring
Once all the walls are assembled I gave the interior and exterior a wash of Hunterline weathering mix. Once dry the office got a coat of Floquil grime followed with Bragdon powders. Powders used are ash, grimy gray and a touch of dust bowl brown as streaks. The ash powder was the heaviest coating. On the shed once the Hunterline stain dries I just used Bragdon powders. Powers used are weathered brown as the main colour, followed with some soot around the edges of the walls, and grimy gray in the large areas. I wanted the shed to look like it had not been painted in decades. The windows and doors got a coat of Floquil reefer white followed by some grimy gray powder.

The chimney was painted Floquil tuscan red followed by white chalk for mortar and red chalk applied on the bricks. I added some Bragdon shoot powder to finish it off. I also added the three exterior lights. I began by painting them Floquil Reading green followed by a light dusting of chalk weathering to tone down the green.

Final note
Don Janes and I both built our models at about the same time and both have posted our versions. As I mentioned the other day my kit is yet to be placed on the layout while Don's fuel company which you will see shortly has been installed. After seeing what Don has done with his kit I wish I had waited till his was done to steal some of his detailing features. I really like the amount of boards he has lifted. Don also added two metal stacks which really adds  more interest to the final appearance. I also like the green coloured doors on the office and shed...stay tuned his post is coming up later this week...well on to my next project...George Dutka.

An overhead view gives one a good look at the finishes used on the roof.

My kit is done and will be added to a Gatorfoam base which will become an interchangeable module with my creamery at Westmister Centre.


Sunday, 24 February 2013

An Oil Tank for Fisher Fuels


This oil storage tank was white and shiny once upon a time but it's location next to the engine terminal at WRJ has left it covered with grime.

Finishing The Oil Dealers Oil Storage Tank

by Don Janes 

     When George showed me the Fisher Fuels kit by Railroad Kits at the Model RR EXPO last Oct. I was impressed with it and knew exactly where I could place it on my layout.  I had a large empty space at the front of the engine terminal at White River Jct.  I had been toying with what to put there for quite some time and here was my answer.  With some planning I layed out the oil dealer on the vacant lot and positioned the oil tank behind the office and garage. 
    The oil tank that came with the kit is made by Rix Products.  It is made from styrene and is very easy to assemble.  I used liquid plastic cement to bond the tank rings together.  It is only 29 feet high so it doesn't overpower the roundhouse area yet looks large enough to represent a busy fuel dealer.  Once I had the tank together I painted it an off white colour.  I started with Floquil Reefer White and added a few drops of Grimy Black, just enough to give it a faded sooty look.  Once the paint had dried I gave it a couple of washes of India Ink and alcohol then used various shades of black, earth and rust coloured chalks to represent the dirt and rust streaks on the tank. 
     For the concrete base of the tank I used Gator Board. With a compass I drew a circle a bit larger than the tank and cut it out with an exacto knife.  Make sure you use a new sharp blade. I sanded the edges smooth and glues the base to the layout with white glue.  Once dry I painted it a concrete colour and used chalks to weather the concrete.
     I really like the looks of the tank and think it blend in nicely with the overall sooty look of an engine terminal.

Here is another view of the tank from a steeper angle to show the layer of dirt on the top of the tank.

This shot was taken from the opposite side of the lot and shows the ladder.  It was made from stamped brass ladder stock the loops of .015 brass wire soldered to the top.  I soldered three "U" shaped brackets on the back of the ladder and drilled holes in the tanks to secure the ladder to the tank


Saturday, 23 February 2013

Fisher Fuels

Over the next few days Don Janes and I will give you our thoughts regarding construction and finishing RailroadKITS Fisher Fuels. We both built the kit at about the same time. Don's kit is already placed on his layout while mine remains on my shelf till it's location is prepared. Today we begin with my tank construction post followed tomorrow by Don's look at the tank. Next week posts will show you what we both did with the main structure...George Dutka

Fisher Fuel - Fuel Tank

The fuel tank is seen completed. I used mostly Bragdon soot to weather the tank. The weathering gives the black undercoat a lighter look.
Completing the Rix kit
The Rix tank kit that is included with RailroadKITS Fisher Fuel is a very simple built. I just followed the diagram to assemble the rings which are made from six panels. I used Walthers Goo for all the assembly. Many modeller's would paint this tank silver or white. I went for black, a colour that I had seen on many tanks while at working on the railway. It also is a colour that really weathers up well. I painted the tank Floquil grimy black. I then used Bragdon soot mixed with a little bit of bright rust. I used a wide brush to apply the powder then used my finger to work it in. I hope you like my tank as well as I do...next post we will look at what Don's tank looks like...George Dutka

The top and four rings that will be glued together shortly.

Tuesday, 19 February 2013

Rutland's - Vergennes, Vt. Station

As the station looked March 2012.
 A Station on the Move
If you have been following the posts on Yahoo regarding the VTS you would have noted that the Vergennes, Vt. ex-Rutland Ry. station had been moved a short distance (about 500 yards) to the Ferrisburgh park & ride lot. The idea is to refurbish the 50'x20' structure. The station is currently sitting on its new foundation and waiting siding. The work is being performed by Mill Brook Constructuion.

 I stopped by the station during March of 2012 and took the following photos. If you want to model a weather beaten structure, take a good look at the siding. A link to the stations move is found below enjoy...George Dutka

http://www.millbroo kvt.com/current- projects/ vergennes- train-station

Looking at the station from the parking area. The ladder is on the south wall.
A rail side view.


Monday, 18 February 2013

Snapshot - Feburary 2013

Railfanning a MEC RS-11 at White River Junction
A Maine Central RS-11 and F-3 A unit lead a southbound freight over the White River bridge as it approaches White River Jct. yard....photos by Don Janes


Maine Central Power Makes A Surprise Visit to WRJ...by Don Janes


          One of my favourite spots to railfan is near the bridge over the White River just north of White River Jct. yard.  At that location I can get great photos of the various B&M, CV and CPR engines that traverse this route.  On a beautiful sunny fall day I figured I would shoot more of the same power that regularly runs on this line.  When I heard the horn of a southbound I set up my camera and waited for the train to come out from behind the trees and start over the bridge.  As I looked through the viewfinder I couldn't believe my eyes.  There on the bridge was Maine Central RS-11 #802 leading MEC F3-A #671.  I was so surprised that I almost forgot to push the shutter release. Once I got the shot I jumped in the car and chased the train down towards the yard.  I couldn't pass up a photo op like this.

I raced to the crossing just north of the yard and caught the train popping out from behind the grocery store.  It's a good thing they had to stop and line the switch into the yard.

Once the train was yarded the engines ran to the shop and took a spin on the turntable. The RS-11 would have to be leading when the train headed back up north.  Note the two newly repainted CV cabooses in the background.

Once turned the power was spotted on the service track to be fuelled and sanded while the crew headed to the bunkhouse for their mandatory rest.  It will be dark when these engines head back out but it sure was a great day of railfanning getting shots of these rare visitors to WRJ.


Modelling a Maine Central RS-11

     ALCO RS-11's have always been one of my favourite locomotives but none of the railroads I model had them so I have never had a model of one.  A few weeks ago I was browsing E-Bay when I came  across an Atlas Classic Maine Central RS-11 with a DCC decoder in it.  I thought boy, I really don't need to start modelling another railroad but this engine would be the perfect way to get a model of an RS-11 that fits my era. I placed my bid and won the auction.  When the engine arrived I was extremely pleased with the model.  It had a beautiful paint job, separate grab irons and MU hoses and ran like a Swiss watch.  There would be a few things I would have to do to it before it went into service on the Green Mountain Division, but the model was a great starting point. 

     The Maine Central originally ordered one RS-11, #801. Portland Terminal also got a RS-11, but shortly after delivery the unit was re-lettered Maine Central and given road number #802. I am modeling no. 802.

     I decided to add a Soundtraxx Tsunami ALCO 251 V12 sound decoder and a 16mm x 35mm oval speaker.  I made a styrene speaker enclosure and mounted the speaker in the long hood facing down.  To complete the electronics part of this project I installed Sunny White LED's (from TCS) for the headlight and rear light and adjusted the various CV's for the decoder to suit my liking.

   Next I turned my attention to adding a few details that would make my model match the prototype Maine Central locomotive.  The Atlas RS-11 comes with a wide fuel tank.  After looking at prototype photos I removed this tank and scratch built a new, narrower tank from styrene adding the necessary details.  I made the fuel filler pipes by bending  finishing nails to the proper shape and gluing them into holes I drilled on each side of the tank.  The air reservoirs under the running board were fabricated from Detail Associates roof mounted air tanks for GP-7/9's. 

   Another detail I added was the hand brake chain and guides on each side near the front of the unit.   The guides are brass castings from Custom Finishes and the chain is 40 links per inch from Builders in Scale.  This detail really adds a lot in my eyes. The bell on the fireman's side of the long hood was made from a Miniatures by Eric RS-11 bell.  Another detail I added was the sanding pipes on each end of the trucks.  These were made from small wire inserted into holes in the slack adjusters on the truck frame.

    If I had one complaint about Atlas diesels it would be the grossly over sized handrails on their locomotives.  To correct this issue I cut each stanchion away from the hand rails and drill #78 holes in each stanchion to accept .015 brass wire.  Before doing this I bend new handrails from brass wire using the plastic handrails as a guide then insert this wire into the stanchions and replace them in the frame.  The result is a much more scale looking handrail assembly.  Since I didn't have any True Colour Maine Central Pine Green paint on hand I used CNW green to paint the brass wire and found it to be a close match to the green on the model.  For the end handrail brackets I used Smokey Valley brass handrail brackets and .015 brass wire.  I added drop steps that I had left over from a Proto 1000 RS-18 and installed Detail Associates MU receptacles in the brackets.  Once the detail work was done I added a light coat of weathering to the engine using my airbrush and some powdered chalks from AIM.

     By adding a few extra details and making a new fuel tank I ended up with a model that closely matches the prototype Maine Central RS-11.

Sunday, 17 February 2013

Ice House - another look

Track side view of the Hood's Ice House.

The following photos of my ice house diorama are as it looks before installation on the White River Division. Not a lot of details are needed to bring the scene to life. One detail I have yet to add is a skid load of ice blocks with a little saw dust added next to the ice house on the roadway ready to be loaded. Tichy has this detail available. I need to remember to order a package...George Dutka

The rear of the structure is seen along with the side roadway.


Friday, 15 February 2013

Ice House - Diorama

West Barre, Vt. has been transformed into a ice storage location with the Fairlee milk platform added across the ROW. You got a sneak peak of this scene in Wordless Wednesday No. 13.

Drop in diorama No. 5
Ice House on the White River Division

At a local RR flea market in 2009 I found a built Walthers N scale ice house. It needed some work as glue was showing in places, it had not been painted yet and the roof vents were not installed correctly. I thought it would work for a background structure or maybe on my Hon30 diorama's as the narrow gauge rolling stock is quite small.

The ice house has some additional height added with strip wood applied to the base. HO scale corner trim is added. The roof vents are re-glued in place and new styrene roof section are added. Now for the paint.

I decided to raise the structures height some what adding a strip wood base and add HO scale corner trim. I painted the body reefer white and the roof grimy black. I added a Hood's placard to the front wall then weather it all a bit. Once done in early 2010 it sat on one of my shelf's till a week ago. I thought it might make a neat addition to my drop in diorama's even though it was N scale. I popped out West Barre station and set in a ready to use base ( I have a few cut in reserve). When I set the ice house down it just looked right and the project moved forward.

I decided to add more weathering with my Bragdon powders, mostly light and medium grays. I placed it on a Gatorfoam base that fits my West Barre location. I think the ice house looks great and it still might be used at another location that would accept the same size inserts...George Dutka

The ice house is painted and weathered. The structure has sat on my book shelf like this since 2010. I have finally decided what I wanted to do with it and freed  up some room on my shelf.

The ice house is seen set in place. I used Bragdon weathering powders tocomplete the weathering. Since it was to look like a very old structure that has outlived the creamery that once stood across the way. The creamery was replaced by a milk platform. The ice house is still used on the White River Division for storing ice blocks which is harvested just a short drive away. Packed in sawdust it still stays cold all summer. This is still the era before refrigeration and home ice chests was the norm.  Locals can come and purchase the ice as need be while larger ice trucks arrive for home delivery on occasion. Some ice is hauled across the tracks to keep the milk cans cold.


An overview of the ice house location on the White River Division. Seems as a B&M milk train is on its way by. By the looks of the milk platform I think the train will be stopping here today.


Thursday, 14 February 2013

B&M Station - Fairlee, Vermont

A roadside view looking north.

The station as it looked in 2012

While following the B&M north out of WRJ I stopped in Fairlee to view the feed mill and station. I was in luck as the station was open and I could take a look around. Currently it is used as a flea market and only open on weekends and the occasional day.

The station is in excellent condition. The paint is fresh and I noted the brick footing on the rail side might have been redone recently. The interior looks as it did when in use by the railroad although full of antiques and stuff. If order board blades were mounted I would think the signal would still operate...well worth a stop if one is in the area...George Dutka

The two freight doors and operators bay are in this view.
Looking north towards the station during the fall of 2012. The order board blades are gone but all else still remains.
The interior of the operators bay. Note the desk and order board handles are still in place.
Order board controls.

Sunday, 10 February 2013

What's in the Box? No. 1 update

The parts are seen out of the package. The oil tank is a Rix Products.
Fisher Fuels oil tank
a RailroadKITS Model

During Don Janes last visit, he brought over my fuel tank kit which should have been included in Fisher Fuels. RailroadKITS sent my back ordered tank to Don which was included in his recent order. As we get together regularly this worked out great. I though I'd show you how it looks just out of the package. I have almost completed the rest of the kit and will cover it in a future post...though you might like a sneak peak at the kit as it looked a few weeks ago...George Dutka

The Fisher Fuels model is coming along really well.  It appears to be an easy build that so far is goes together nicely...I best stop there as I do not want to curse the project.

Saturday, 9 February 2013

Passenger Shelter


Chris added a safety flag and a coal poster on this neat little shelter.

At the last train show I attended Chris Martin an old friend of Peter Mumby and I stopped by and offered me a small passenger shelter. He had built a pair and though one might look good on my layout especially if I was running more contemporary trains. Chris is a NYC-Penn Central modeller and spends a load of time building great layout details. The passenger shelter is kind of a small neat addition I can use when I change out my 1950's era equipment for something newer. One problem, when I put the shelter on the layout with that nice looking girl inside my section men seem to disappear...George Dutka

Hey that young girl is causing distractions to my White River Division crews.

Friday, 8 February 2013

Home Gas Corporation - Tank Cars

CV 8027 switches out a propane load and lifts a string of empties on the White River Division. The models are a past offering from Atlas.
 Adding a fleet of Homgas
propane tank cars

Over the last few years I have been able to collect a small fleet of four Homgas propane tank cars. Homgas was based in Housatonic, Ma. supplying fuel to a chain of propane dealers throughout New England. Customers included a dealer in Oxford, Maine on the GT (installed in 1957) which today is Amerigas and a dealer just south of the CV yard in Palmer, Mass. in North Monson, Ma. Other locations were in Hudson Falls, NY, Chester, NY and Housatonic, Ma. It was noted that only 5 cars remained in service by 1960.

Replicas of the the 11,000 gal., 50 ton capacity tank car was available in HO and N scale by Atlas. I was able to add to my collection:

FGCX 60
The Fuelgas Corporation
L&HRR Siding, Chester, NY

HGCX 63
The Homgas Corporation
B&A Siding Palmer, Mass

HGCX 70
The Home Gas Corp.
North Monson, Mass, The CV Delivering RR.

ABX 5645
Adirondack Bottled Gas Corp.
Hudson Falls, NY...this car was also produced in N scale.

Atlas had at least three more cars available in the past, FGCX 100, The Fuel Gas Corp. L&HRR siding, ABX 189, Adirondack Bottled Gas, Arlington siding NY, and ABX 431, Adirondack Bottled Gas, Saranac Lake, NY. There might have been more but I am not currently aware of any.

My newest addition to the fleet found 1st up behind the engine got the heaviest weathering of the group.

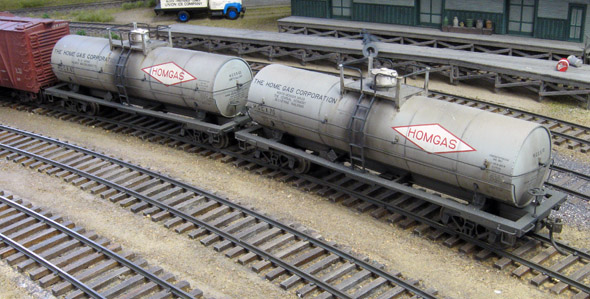
I took this photo of two Homgas tank cars on Don Janes layout a few years ago. Don had Neil Scholfield weather up this pair of Homgas cars. Don't you think these two tank cars really turned out great.
Another look at Neil's weathering handy work on Don Janes propane cars.

I have viewed a couple of prototype photos of these cars lettered, HGCX 978, The Home Gas Corporation, Housatonic, Ma., HGCX 119, The Home Gas Corporation, Housatonic, Ma.

The Models
The Atlas models look great right out of the package. One change I made to my cars was switching out the larger looking couplers with Kadee true scale #58 couplers. All my cars got an over spray of Floquil grime and grimy black with a little bit of chalk weathering. All the weathering is very light on my first three cars. My last car purchased, FCGX 60 got a heavy grimy black spray down the ladder area with additional Bragdon weathering powder streaks for a heavily weathered look...George Dutka

One can see my current fleet of four Homgas propane cars at Westminster Centre.

Tuesday, 5 February 2013

Arched Window for White River Jct. Station

I am holding up an O scale window which is the exact size as the WRJ station window but with a slightly different pattern.

 A good option

Last week while Peter Mumby and I worked on our On30 modules, Peter brought over two mixed packages of Grandt Line O scale windows and doors. We each have a structure to build for the modules. While going through the packages I found a half circle window that looked a lot like the one found over the White River Jct. station's door on the CV side. I took it over to my station and found it was the exact size although the window slats differ a bit, but by far the best option I have found to date. On my model I used a photocopy of the real window that I might just change with this casting...George Dutka

The WRJ window along with our bag of leftovers...think we better build a few more O scale structures.