Thursday, 31 October 2013

Year Three Begins

A peek inside the window of the Polka Dot Diner at White River Junction, Vermont. One of my newest structures. Lets peek into the upcoming modeler's season of the WRD.
White River Division is two years old today.

Today is kind of a happy birthday. I started this blog two years today...boy time does flies. I never thought I would have enough to say or show you to keep rolling along as I have. Seems I must have done something right...maybe keeping enough photos and files on hand plus Don's posting helped. Year three is looking really good. The White River Division is taking on a new look. I have a lot to share with you over this modeler's season. I just finished a model of the Polka Dot Diner that still stands in WRJ next to the tracks and last month I finished my Westboro sand house. These probably will be posted in the next few weeks. I will be gone for over a week departing on Monday next week...Don and I have a full schedule of layouts to visit and railfanning to do...we should have a lot to show you once we are back. So stay tuned. I hope you have enjoyed the past two years and plan to check in regularly again...it has really been fun...George Dutka

I have been playing with the track arrangement at White River Junction. I came up with the idea to turn the station around viewing the B&M side. This puts the lead to Westboro (curving into the foreground) in the right direction. My ball signal will sit where the tracks are seen crossing and where it should be. My CV coaling tower and yard well off to the right will now be in the right spot too. Only problem is my building flats are now in the wrong location. Will leave them there for now but might build a view of down town WRJ as a replacement.

Sunday, 27 October 2013

Bennington Mill - South River Modelworks

This is the South River Modelworks web view of there new kit. There are 3 structures included in this kit.
H.W.Myers & Son

Don Janes and I discussed the new South River Modelworks kit this week. Don has already ordered one with a good location in mind on his expansion to the Green Mountain Division. Don has already built many of the South River's kits and raves about how great they are. The price is steep, $300 for the mill complex but there is a lot included in the kit. Actually when you think what one spends on say an engine it is not all that bad price wise. At least that is me reason for ordering one also. I do actually have a spot on the layout that I have been thinking of replacing a structure with one that is  more detailed. The footprint of H.W. Myers & Son is an exact fit. Don and I plan to pick up our kits at the Expo next month....saving the shipping charge...what a deal.


Old sign on the mill.
I had actually stopped by the prototype location in Bennington, Vermont last fall. It has been used by Bennington pottery for many years now. The mill was located on the Glastenbury branch or spur of the Rutland Ry. The prototype structure, or what remains today is a really impressive blast from the past. I took a group of photos of the structure at that time....enjoy....George Dutka

Street side view of the mill location.
Rear view. The building has had some add-on's over the years.

This is an interior view of the overhead details. Today the mill is a retail outlet for pottery products.
Door details.


Do you see the lignt?


Friday, 25 October 2013

Ambassador 1956

A postcard view which gives one a good look at the consist of the Ambassador at West Hartford, Vermont during the summer of 1956. George Dutka collection.

A Tuesday Visit

The new Green Mountain Division's crossing tower located not that far away form Don Janes White River Junction scene. I will have to figure out if I have a spot for one of these towers on my layout.
I was down to Sarnia dropping off my sails and cover for some minor repairs on Tuesday. I also stopped by Don Janes to catch up and plan our trip to this years Model Railroad Expo...being held in the Berkshires this year. Once we had everything sorted out we went down stairs to see how the Green Mountain Division was doing. There has been many changes since my last visit. One addition that caught my eye near the end of my visit was the installation of a raised crossing tower not far from the White River Junction yard. It is a Broadway Limited brass model. Don has done a nice job repainting and displaying it. Although on the CV the crossing tenders that I have seen photos of are at ground level. Crossing towers similar to the Broadway model could be found in other locations throughout New England. I also recall a few on the near by D&H. Don and I have seen many of these towers ourselves during the years we worked on the CNR. One similar to Don's model was located in Kitchener till about 15 years or so ago.

Early in my railway career (maybe 1979 or 1980) I was laid off which happened each winter for many of the trainman with my seniority during that era. I had the opportunity for a job one winter to work at the three crossing towers here in London. That was a really nice experience....George Dutka.


Saturday, 19 October 2013

What's in the Box No. 3


Full Steam Ahead...the Gas Station...HO Scale

I recently purchased a small gas station kit from Full Steam Ahead. I have not build a service station yet and was also interested in trying one of Joe Rutter's kits. Full Steam Ahead is located in Owen Sound, Ont. about 3 hours north of my home. The model is from an earlier era than I model but I do recall seeing a similar structure in Vermont back some years ago. These kind of structures seem to hang around a long time in New England. I thought this structure might be interesting to add to the White River Division, if not it fits the era well for my narrow gauge modelling.

My kit arrived less than a week after ordering it on-line. Included are a group of well detailed colour instruction sheets, a ton of nice signs, good looking castings and laser cut wood walls, doors and windows. The gas station comes with a bonus building a garage all for just under $35. The footprint is nice and small....gas station dimensions are  5 1/4″ x 1 3/4″ and the garage measures 2 3/4″ x 2 1/2″. Joe indicated the kit is based on a photo of a real gas station....link to the site is below....George Dutka

FullSteamAhead

Everything included in this little box is seen here.
The laser cut windows, doors and glazing. The kit includes some nice metal casting as seen in this photo.
The kit comes with a nice selection of signs.

Friday, 18 October 2013

Mystic, Ct. Station


I stopped by Mystic Ct. during October 2011 to visit the Seaport Museum. I also went track side to see what was left in town. The old NH station is in very good shape being used as a commuter-passenger stop plus the towns tourist information centre. I had to also stop by Mystic Pizza for a slice...mine was meatball pizza. Mystic is the location of the movie featuring Julia Roberts called Mystic Pizza...I believe there is a 25th year celebration for the movie this year with the reunion of the actors involved in the film. An unknown at that time named Matt Damon had a 10 second part in the movie....George Dutka


Looking north.

Rear wall of the ex-NH Mystic, Ct. station.
Early era postcard of Mystic station.
Every detail of the station is in great shape.
Looking south.

Tuesday, 15 October 2013

Building a Static Grass Applicator

The fly swatter and strainer are the two main items needed to built a grass applicator. Note the end of the strainers handle. One with this type of hole works the best. The hole lines up perfectly with the screw in the fly swatter handle and is very secure.
 Another use for a electric fly swatter

Back in the spring of 2011 Peter Mumby and I attended a WOD meet...our local division of the NMRA. It was held in Woodstock, Ont. One of clinics stuck with me till I finally built my own. Don Wesley showed us how to convert a electric fly swatter into a static grass applicator. It actually seemed as a really easy build. One needs the fly swatter, (I found one for $3.00 last fall at Giant Tiger), strainer, wire and alligator clip. We got a chance to try out the one Don built and a few others he brought along...they worked great.

Once I finally got around to it...two years later, it took only about 30 minutes to build. I had all the other parts in my workshop other than the fly swatter. The construction cost is very low. What one does is take the fly swatter screws out. break or cut off the swatter part. You only needed the handle and the two wires that attach to the swatter. The button is needed also so keep it in place when taking the handle apart. One wire is soldered to the strainer and the other to a foot or two of wire which has the alligator clip attached. Heat sink covering was used as insulation to the bare wire inside the handle. The strainer was just set in place using the lead screw on the handle. It is very secure. On other styles to secure the strainer one might have to also add some tape or drill a couple of holes for screws. That's it...now I can plant some new grass...George Dutka
The static grass applicator is ready for use once two D size batteries are added. Note I used a piece of white heat sink covering to keep the bare wire found in the handle from shorting on anything.

Monday, 14 October 2013

Moving the Goderich CPR Station

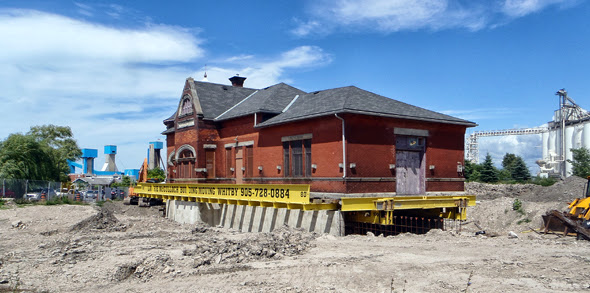
The station now rests on its new foundation next to Lake Huron. This structure weighs in at 400 tons.

Over the Spring and Summer I visited the CPR station location in Goderich, Ontario on a regular basis to view the progress being made. It is very near my boat. It was interesting to see how such a large heavy building could be moved. I don't recall hearing about any other brick stations ever being moved in the past. The CPR station was to be moved only about 250 meters to the lakefront...or waters edge. It will eventually become a restaurant.  A video was made of the move which shows better than 2 months of ground work plus the eventual move in 158 seconds. The link is below. The move and rebuild will cost a total of 2 million dollars...I hate to think the cost of the burgers and beer there next summer...George Dutka

▶ CPR Station Move - YouTube
 
It took two and one half days to move the station beginning on July 31, 2013. It needed 3 trucks hooked together to begin the move as the ground was very uneven. Later they used just one to move the station around.

The basement walls have had holes knocked out so these steel beams can be slid underneath. The beams will be used to slide the station off the basement walls while other are used to jack up the station. A seven foot deep trench needed to be dug around the station so the holes could be made through the 20 inch thick concrete walls.
The station is slid off its basement walls. The next step was to install 96 wheels under the portable platform. One can see the beams still in place that had to be placed through the foundation walls holes.
This early evening view shows the station on the portable platform and slid off the basement. The wheels will take over a week to be added.


On my way back from the North Channel by sailboat in early August we passed by the beach location where the station now rests. I took this photo with a telephoto lens from about a mile off shore.


Sunday, 13 October 2013

Central Vermont - Bethel, Vermont


Looking south at the station.
Still there...Bethel Station

During the fall of 2012 I followed a portion of the Central Vermont Ry. that I had not seen in over a decade. It was interesting to see what is still in place and what was gone. The Bethel station is still in use as a eatery and appears to be still in good shape...George Dutka

A roadside view of the ex-station
A postcard view of the Bethel station from years ago.
It was interesting to see an old CV sign still in place even though it has been well over a decade since the CV existed.
The train order signal is partially in place.

Friday, 11 October 2013

MEC Section House

My finished model of a Creative Laser Design's kit I purchased at the 2011 Expo.

Creative Laser Design`s  - MEC Section House

In my very first post on this blog I briefly covered the MEC section house kit I purchased at the Model Railroad Expo 2011. I really liked the looks of the kit and thought I would give you a second look. The MEC section house kit was a new experience for me at that time. I wanted to try constructing a wooden laser style kits. All the structures I had built to that point where scratch built or resin model kits. The MEC kit was an easy build and since then I have completed more complex laser kit structures. The current plans for the MEC section house is to add it to my HOn30 C&Q Ry. junction yard scene. So lets look at how it went together.

The instruction sheet is seen behind the kits parts. One can see the Northeastern slate roofing and the interior flooring along with the other detail parts. The hand car is not included with the kit.
The basic wall sections have been assembled. The doors and windows are seen ready for painting.
 Lucky I saved a few notes as my memory is really short these days.The structure went together well as per instructions. I did not add any additional bracing since it was so small. I added Northeastern 1 by 6 trim under the eaves. I added hinges made from styrene cut as a triangle. A door handle was also added which is not included in the kit. The base or floor is painted Floquil grime with roof brown streaking. I then dry brushed some white and black while the floor was still wet. Additional chalk weathering was added later. The walls are painted Floquil SP lettering gray and the trim is Floquil  coach green and dry brushed Vermont green. I also hit the trim with a bit of green and black chalk to weather it up a bit. The included roofing is Northeastern Scale Lumber slate sheeting which is a really nice product to be included in the kit. The unfortunate thing is they do not give one enough roofing to built the model. When I fitted the roofing it was two rows short. The width was a bit more than need be and had to be trimmed. I used the trimmed shingles to make up the top two rows. These had to be glued on individually. There was no roofing cap strip included. The roof and walls got a light weathering of black and brown chalk. I added some glazing to the window and cut a paper bag blind.

I added an interior since I was leaving the front sliding door open. I also left the side door open. I put a hand car inside along with two Juneco section men. I added a few tools, barrels and crates at locations that they could be seen...a great little addition to my modelling scenes...George Dutka

The section house is seen separate from its interior flooring. I added a good amount of details were it could be seen through the open doors. I glued the two section together with a couple of dabs of Walthers Goo.

The interior has been added to the section house.

Tuesday, 8 October 2013

Snapshot - October 2013

Nothing unusual about this photo other than Don Janes catching me taking a down low photo of the CNR power that had come in on the Southbound freight. Don and I try at times to catch each other in the scene on our outings.
Visiting St. Albans

Back in Oct. 2010 Don Janes and I attended the CVRHS convention held in St. Albans. I was invited to attend the meeting on Friday evening regarding the the CVRHS  quarterly the Ambassador. Don and I arrived early at the head office where the meeting was to be and found the southbound had arrived in town. The power was run up to the office and the crew went inside for a moment. Well that was a good time to get a few different angles of the power. Don took this photo of me getting a down low view. I always like trying a low level shot when the opportunity arises...George Dutka

Sunday, 6 October 2013

White River Division's - Glory Days

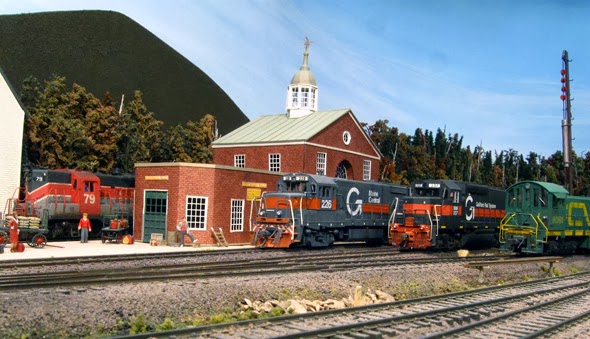
This is how I would have envisioned Glory Days if it was held on the White River Division in later years.

  White River Jct. Glory Days
on the
White River Division

Each September White River Jct. Vermont hosts a festival called Glory Days. 2013 was the 21st year. It is a mix of food, fun for kids, music and railway displays. An operating passenger train is also included giving one rides north out of town. Well when Peter and I were in the process of shooting a contemporary display of engines on the White River Division I decided to hold my own Glory Days as would have been seen 30-40 years ago on my line...George Dutka

A pair of Guilford engines are posed for the local railfan...Oh I think that is me.
To the far right the Central Vermont shows off a nice clean looking S-4.  No. 8081 is a factory painted Atlas offering that I added numerous details to. A BAR geep is seen tucked in behind the WRJ station. Looking a little out of place it is actually in town on loan and adds to the colorful display.
These two Maine Central U25B`s are seen in two different paint schemes. They sure look good out front of the station. On the prototype these MEC engines did on occasion call on White River Junction.