
Wednesday, 30 November 2016
Monday, 28 November 2016
Snapshot - November 2016
 |
| CN cabooses are seen stored at Mac Yard Jan. 31, 1991. |
Sunday, 27 November 2016
Bar Mills - A New Shack for Bellows Falls
 |
| All finished and ready to be installed in my mill scene. Some glaze is added around patch areas on the roof. The blocks and skid is from Bar Mills but the rest of the junk is from my detail pile. |
 |
| The shack is set next to the tracks and near the mill area. |
 |
| The basic construction went quickly using canopy cement, a glue that sets up almost instantly. All the wall details are on the sheet to the left. |
 |
| The areas seen under the torn siding paper was painted Floquil Grime. I also added this to the roof. Some Bragdon soot was rubbed into these areas also with my finger before the paper was added. The laser cut wood battens are applied as-is. They look like real weathered wood already. There are lots of block included. |
 |
| The siding paper is coloured using Bragdon green grunge before application. The white on the windows is PanPastels powders applied with a micro brush. The roofing is Floquil grimy black with Bragdon shoot brushed on. |

 |
| I think the siding paper is pretty realistic. |
 |
| An overall view of my Bar Mills shack set near the loading docks at the Bellows Falls mill area. The fencing is also a Bar Mills product. |
Saturday, 26 November 2016
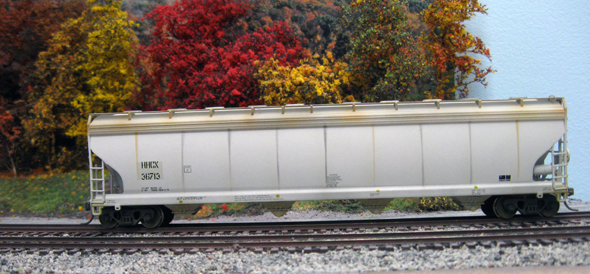
Burlington Jct. - Steve Tuff
 |
| Lots of contemporary power is found on Steve Tuff's layout. |
 |
| I really liked how the weathering is done on the covered hopper. |
 |
| An overall view of an area were the scenery is well underway....very realistic. |
 |
| Nice weathering |
 |
| On Steve's layout he has a crossing blocked with barriers. These are a neat kit which Don scooped up the last package of on the shelf offered by Osborn Models. |
 |
| Peter Mumby passed along a Trains feature magazine called Locomotives 2016. In there was a short article on the real Burlington Jct Railway. Located in Rochelle, Illinois, Burlington Jct. Ry. actually uses two old ex-CN MLW S-13's as their main motive power...Don mentioned working on these MLW engines as a yard helper at the Toronto coach yard...might have even been this same unit. |
Friday, 25 November 2016
A Brick Work Shop
 |
| My new brick work shop set on a piece of Gatorfoam. |
 |
| The one on the left show how the shop once looked, with that one actually being the better of the two. |
 |
| This side wall was a mess of glue, chips and cracks. I decided to cover the entire wall using a Coke sign which was a handout by Gatorfoam at this years Expo. The ladder is a FOS Kits give away from a few years ago. I added some trash to the roof for added interest. |
 |
| Most of the coal and fuel signs on this model came from my Fisher Fuels kit (RailroadKITS). |
 |
| The posters on the wall are from the last modeler. I just gave the walls a wash of dollar store craft white paint to fill in some of the mortar lines and hit the walls with Bragdon powders, dark rust. The roof got a small vent before being painted grimy black with powders added. The concrete front walkway has cracks and lines etched into the Gatorfoam then painted Floquil concrete. I added some Bragdon dust over the surface with my fingers. |
 |
| Newspapers, barrels, crates and boards line the outside of the building. BEST propane tank is used and Juneco fire hydrant is set next to the shop. |
 |
| Windows and doors are coloured with green powder before being applied back to the walls. Unfortunately I could not remove the glazing without damaging the doors or windows...so they are as is. I added some ground foam, weeds and long static grass to finish it off. |
Thursday, 24 November 2016
Throwback Thursday - Head End Cars
 |
| CNR No. 17 westbound through Paris, Ont. 1955. Note the two express cars on the head end. |
Wednesday, 23 November 2016

Tuesday, 22 November 2016
Steel Cars in Hamilton
 |
| Stelco Steel on its way out of Hamilton, Ont. on the HOMES layout. |
 |
| A lot of TH&B flats found loads of steel aboard. |
 |
| A close-up look at how the steel is marked prior to loading. |
 |
| Steel slabs also moved in CN gondolas...note the bracing. |
Imperail Oil Tankcar
 |
| An IOX tankcar on the WRD. This is a Proto offering from sometime ago. |
 |
| From my collection...unfortunately there was no data on the back. |
Monday, 21 November 2016
Adding a Stone Arch Bridge To The Green Mountain...by Don Janes
 | |
| A Rutland freight headed by RS-3 201 crosses the Stone Arch bridge south of North Bennington. |
A New England Style Stone Bridge
Back in 2009 while on my way to the Springfield Train Show I visited friend and fellow B&M modeller Jim Dufour's B&M Cheshire Branch layout. (See earlier post by George on this layout) Jim has faithfully modeled five towns on the B&M Cheshire Branch as well as some signature scenes on the route. One scene that really stuck with me was his Stone Arch Bridge just past the State Line Station. Jim created his own patterns and cast the bridge in hydrocal. It is a simple but very impressive scene.
While I was there Mike Evans, a very accomplished D&H modeler was there making rubber molds of the bridge for his layout. Several years later when I was planning a river on my Green Mountain Div. layout I thought of Jim's stone bridge and how it would be the perfect bridge for this scene. But how to make it? Then I remembered Mike and his rubber molds of the bridge and decided to
contact him to see if by chance he had made any extra copies. Mike
graciously sent me two cast hydrocal castings of the bridge so all I
needed to do now was add them to my river scene.
 |
| This shot of Jim Dufour's bridge was my inspiration to build one for my layout. This shot was taken back in Jan.2009. |
After planning how I would incorporate the bridge into my layout I have finally finished the scene. I am quite pleased how it came out. I really appreciate Jim allowing me to use a copy of his castings and Mike for making an extra set for me.
 |
| Here is another view of the 201 crossing the bridge. |
 |
| On a different day Rutland 2-8-2 #37 is leaving N.Bennington with a milk train. The North Bennington Creamery in the background was featured in a previous post. |
 |
| Just as #37 was crossing the bridge a northbound freight behind #201 appeared from behind the trees. |
Sunday, 20 November 2016
SuperTrees Adjustments
 |
| Don Janes is working away on his SuperTree with a soldering iron. |
Saturday, 19 November 2016
A CN Proto 2000 Gondola
 |
| My newest gondola is seen in service on the WRD...and it already looks well used. |
 |
| This is how the interior looked with a coat of Hunterline stain. |
 |
| This is how the floor looks with a coat of Floquil grime and a wash of India ink. I think it is looking a lot better. I actually scribe the floor before adding this finish. |
 |
| I added a little more detail (junk) than I normally do. Some F&C concrete blocks, wooden ties, Tichy barrel and lid, tie plates, skids and some steel rods and newspapers. I cut out a CNR herald I colour copied and leaned it on one side. Some dirt from my Westboro jar and Scenic Express pasture mix rounds out the additions. |
Friday, 18 November 2016
CP Alco's in Vermont
 |
| CP 8400 in the classic maroon and gray. Gord Taylor photo |
 |
| Newport, Vt. |
 |
| Newport, Vermont, Gord Taylor photo. |

Thursday, 17 November 2016
Branchline New Haven Boxcars
 |
| Three new boxcars added to the WRD fleet. Nice to find items that are ready to roll. |
 |
| All three are nicely weathered. Now to duplicate this on the one I built a few years back. |
Section House added to WRD
 |
| Another section house is in service on the WRD. |
 |
| All the details are glued with canopy cement to the structure. |
 |
| I added enough detail to hide the ground joints. |

 |
| The Gatorfoam base is in place with some plaster cloth to tie things in. The base colour paint is being applied. |
 |
| The finished scene in place. If I want to change section houses all I need to do is lift if off with details included. |
Subscribe to:
Posts (Atom)