I mixed up the posts yesterday and have re-posted my Work Service Flat Car post today. For some reason it will only post under yesterdays posts...so scroll down today for the post.
Over the last few months I have reduced the size of the photos so they do not use up too much of my allowable blog space..meaning the quality is lower then before. If there is a photo you ever want to have for reference in better quality please e-mail me and I will send you one...George Dutka
Thursday, 29 November 2012
Wednesday, 28 November 2012

Modeling Work Service Flat Cars
 |
| On a short CV freight my work flat heads to Bellows Crossing on the White River Division. |
Converting Flat Cars to Work Service
This project came about after visiting the Crow River Products Crow River Products Model Building Supplies booth at this years Model Railroad Expo. I purchased a cast metal lift magnet and a clam shell bucket. I thought these would look great loaded on a flat car. At that time I was not sure which car they would be used on but I did remember seeing a CV flat which came from the CNR and placed in work service. I had an old Athearn flat (from my childhood collection of the early 1960's) that resembled this car and the project began. I called Peter Mumby and asked him if he was interested in building a work car load as I had an extra magnet and detail parts. He had a TH&B flat that could be converted to work service and would work well with a TH&B crane he is also working on.
 |
| My flat car as it looked before the project began. This car dates back to my childhood railroading. |
 |
| Some of the details that are to be added to Peter's and my flats. I decided to add a wooden deck over the plastic deck. The wooden sides are yet to be added to hold the load on the car. |
The Athearn car was originally outfitted with a air plane with folding wings. I removed all this off the decking plus the hand brake, stirrups and grabs. I added a new wooden deck using Mt. Albert wood strips right over the old decking. Kadee true scale #58 couplers, Tichy wire grabs, Tichy stirrups and a Tichy brake wheel and wire rod are added. I also added a bent wire bleed rod and Details Associate #6215 cut lever. The planking around the deck is done with Mt. Albert 3 by 12's left from my tunnel portal project. This was already stained and weathered and only needed to be cut to lenght. The side pocket supports are scrap 2 by 6's.
The car was painted boxcar red and CV Champ HB-361 decals are added for the lettering and some data. The rest of the data was found on XD-637 Walthers data sheet. The decking is stained with Hunterline weathering mix. Once dry Floquil grime, pine stain and roof brown was washed over the planks then covered with weathering powder.
 |
| The magnet is seen still in the bag along with a primed bucket ready for weathering. A CNR prototype photo of a 52' flat loaded with work equipment including a couple of shell buckets. This photo was great inspiration for my project. Note not all pockets need stakes. |
The CV Load
For the load I used the Crow River Products magnet and Hayward clam shell bucket as the main features. I also added a piece of weathered rail and beat up wooden boards and blocking. Some fine wire was coiled to resemble cables that would be laying around the car. Metal castings of a pail, shovel, barrel, wrench, BEST models wire reels and a shovel are also added. I added a few Juneco track bumpers to one end along with some wire rods. Everything is given a heavy dose of weathering powder for the well used look.
 |
| My CV flat is loaded with all the kinds of things used by track crews. |
TH&B Flat car
Peter had a Proto 2000, 52' flat car that he decided to put in work service. Since Peter's car was finished he just added some of my stake material in the pockets and the 3 by 12's sides from my portal project. Since his car is longer he had more room for details. He added 3 or 4 more pieces of rail than I did, wire coils, some wooden bracing, a magnet, a few Juneco rail bumpers and a BEST models wire reel. Peter did not have a clam shell bucket at the moment, but used mine for the proper spacing so one can be added at a future date and for this photo.
 |
| Peter's finished TH&B work car. |
Rutland Ry X578
Many years ago I built a Rutland Ry. work flat car with wooden sides and a small load of rail following photos I took at the time. This is a F&C Rutland Ry. flat car kit that came in two packs back in the late 1980's or early 1990's. I am not sure if it is currently available. I had seen the X578 in Bellows Falls, Vermont yard may times in the 1980's and took a group of detailed photos and measurements. Since I was on a roll I decided to update my finished model by adding some more details and weathering powders. I added wire coiled as cables, Juneco rail bumpers, a larger rail bumper, pail, shovel, barrel, steel rods and old crossing sign. These additions really added to the finished appearance of the model...George Dutka
 |
| My F&C model built in the early 1990's has additional details included to what once was only a load of rail. |
Tuesday, 27 November 2012
CV 40' Flat Car
 |
| CV #4287 is totally restored and on display at Willimantic Ct., Oct. 2011. |
Central Vermont #4287
Most of the CV 40' or less flat car fleet were of steel centre sill design. A flat of this particular design sat for many years on display in White River Jct. and later moved to the Kendall's collection in Barnet, Vermont, it's current home. The Central Vermont did acquire one 40' flat car that was of CNR heritage, CV no. 4287. I am not sure of the date transferred to the CV, but it is thought to have happened in the early 1960's. This flat was assigned to work train service when on the CV. Originally built in 1914 as CNR #660071, today it is part of the Connecticut Eastern Railroad Museum collection in Willimantic, Ct. The flat was totally rebuilt in 1999...George Dutka
Sunday, 25 November 2012
CV New London - Coal Tower

Central Vermont Coal Tower
I got this view as a retirement gift from Tom Sanders, a conductor I worked with for many years on the CNR. Tom, a railfan, grew up in New York City. In 1958 he was able to make a trip up to Connecticut to see the Central Vermont in New London. This view is one he took that day. We had a B&W copy of this slide published on the back cover of the CVRHS Ambassador in 2010 but I thought this would be nice to see in colour as it was taken...George Dutka
Saturday, 24 November 2012
BEST Metal Detail Parts
Dean Splittgerber recently sent me a link to the BEST model kit web site, casting page. Dean found this link in the latest RMC advertising BEST HO scale castings. I had seen and also purchase a few packages of these castings at the Model Railroad Expo this fall. They are very nicely done and I have already put some to use. You might want to check these out for yourself at the following web link that Dean supplied...George Dutka
http://www.besttrains.com/products_4000.html
http://www.besttrains.com/products_4000.html
Friday, 23 November 2012
CV Caboose - Walthers-True Line Trains Mix
 |
| Two Walthers cabooses are currently in use on the White River Division. |
Central Vermont Caboose Kitbash
CV #4022 and #4017
CV #4022 and #4017
This project began back with my March 12, 2012 post. Peter Mumby and I split a two pack of Walthers CV maple leaf cabooses. We both purchased a True Line Trains CNR style caboose for the under frame, steps and smoke stack. The leftovers might work its way into a GT New England Lines centre cupola caboose at a later date. You might want to take a look at the March post for our early construction photos that view the two cabooses pulled apart.
 |
| Our two caboose, one with the under body details removed and the other still to do. |
From the True Line Trains model I used the frame, trucks, couplers, smoke stack, steps, markers, ends and ladders. The weight from the True Line model is not used as the CV Walthers shell has the weight set inside. The Walthers model body needs the bottom cleared of details and sanded smooth so it will rest on the True Line frame. The True Line frame also needs a bit of work to flatten the surface. The fit is very good without much work. I used Goo to attach the two together. The roof from the Walthers caboose is used. The True Line roof was too wide. The Walthers roof does have some ribbing that could be covered up but I left as is...it does not show much once painted grimy black. Another option is to add a tissue cover over the roof. On the Walthers roof I trimmed off the flashing around the smoke stack and added the True Line stack which is a lot nicer. The stack is painted Floquil old silver.
 |
| The Walther body is set on the True Line frame. The area around the smoke stack needs to be cut away and the ends of the ladder needs removing. |
The cupola is one from a F&C kit...my kit had two cupolas. I made sure the bottom edges of the cupola are aligned and trimmed well, since if I don't a lot of sanding is required for a good fit to the roof. I added the wire holds to the roof and painted the cupola roof grimy black and the sides a mix of Floquil reefer orange and caboose red. The colour needs to be just close as the black of the roof separates the two colours. The body colour seems to be more orange then red. The fit over the Walters roof cupola opening is very good. I once again Goo'd it on.
 |
| The True Line steps battery box and under body is painted and powder weathered. The interior was repainted and a green lower area added. The stove is painted grimy black. The roof details are in place but still need painting. |
The ladders are trimmed straight and squared wire is added to finish off the ladders. I used the couplers supplied with the True Line Trains caboose as they seem quite nice. The under body got two queen posts on both sides. They are Grandt Line #5053. I added some scrap wire for the rods. The whole under body is painted grimy black. I painted the battery box, stairs and end platforms the orange-red mix then used Bragdon weathering powder Dark Rust over the wet paint. The weathering powder has the CNR #11 red tone when applied. It also works well applied on the trucks.

The side of the True Line frame needs to be painted to match the Wathers caboose sides. This I thought needed to be a better match. I brush painted this area adding more orange then red till the colour looked good. As it turned out once I did a little weathering it all blended well together. My cabooses get lighter weathering than my other rolling stock. The last details added are the markers included with the True Line model and a Juneco metal casting of a conductor on the rear platform. My caboose project turned out better than expected. I am happy to have a CV maple leaf logo caboose on my roster now...George Dutka

Wednesday, 21 November 2012

Tuesday, 20 November 2012
CV Station - Middlesex, Vermont
 |
| The old CV station as it looks in Sept 2012. Note the window is out in the operators bay. There are a few other spots opened to the weather. Hopefully these will be closed off to protect the interior. |
Central Vermont Ry. Station
Middlesex, Vermont
 |
| A postcard view of CV Middlesex, Vermont station. |
I stopped by the ex-Central Vermont station in Middlesex, mile 81.1 Roxbury Sub. during Sept. 2012. It is located 4.8 miles south of Waterbury, Vermont and 4.7 miles north of Montpelier Jct which locates it midway between the two stations. I found the station still standing but beginning to deteriorate. It has been more than 10 years since my last visit here. For a 92 year old wooden building it is actually still in good shape. The main thing is the roof remains in good repair which is keeping the weather out.
This CV station is the second depot built in Middlesex. The first was built in 1877 but was destroyed by fire in 1917. The current station was erected in 1919 and was closed in 1958. In the 1950's Middlesex had a 61 car siding with secondary track capacity of 12 cars. I looked in a late 1960's CV timetable which does not indicate a designated siding any more for meets although it notes total secondary trackage capacity to be 73 cars. Today there is no trackage other than the NECR main line through town...George Dutka
 |
| Looking across the tracks from the cemetery viewing the south and east side of the station. |
 |
| A roadside view of the station. |
 |
| I took this photo through the broken window looking at the opposite wall of the operators bay. |
 |
| I also shot a view of the room to the south of the operators office. |
Sunday, 18 November 2012
S-4 stack cover
sw
While at White River Jct. Glory Days back in September I watched as the Claremont Concord S-4 was spotted for the night in WRJ. It was also going to be on display for the next days events. What surprised me was the engineman climbing up on the top of the engine body, picking up a cylinder and capping the exhaust stack. I had not even noticed the cover on the roof while he was switching. If one was to model this engine, this detail would be a nice addition...George Dutka
 |
| Engine 104 has been secured for the night. Now the engineman applies the exhaust stack cover. |
Capping the stack
While at White River Jct. Glory Days back in September I watched as the Claremont Concord S-4 was spotted for the night in WRJ. It was also going to be on display for the next days events. What surprised me was the engineman climbing up on the top of the engine body, picking up a cylinder and capping the exhaust stack. I had not even noticed the cover on the roof while he was switching. If one was to model this engine, this detail would be a nice addition...George Dutka
 |
| The exhaust stack cover rests on the roof of the engine while switching at White River Junction, Vermont. The engine has just been parked and the exhaust stack will be covered shortly. |
Saturday, 17 November 2012
P&LE AAR Boxcar
 |
| The two finished boxcars are awaiting lifting on the White River Division. Peter Mumby's model is on the left while mine is to the right. |
Using up C&BT Shops Boxcar Shells
Last winter Peter Mumby dug out a full box of C&BT Shops AAR 40 foot boxcar shells he has had for years. The shells did not have any doors, or details added. Some had floors while other did not. We decided to see what we could come up with using up some of our old decals and parts. We found enough stuff on hand for a half dozen models each using our leftovers. What a deal a half dozen cars that will not cost me a dime just my time. The first two models just completed reflect two different era paint schemes of the P&LE boxcar.
 |
This C&BT Shops car is just about ready for a coat of paint. |
 |
| My model reflects what the boxcar would have looked like when built through the 1940`s. |
P&LE 5000
I decided to work from a group of photos published in the Oct. 1955 issue of MR. I had a Champ decal for this early era scheme. The car`s prototype had a 6 foot door but my shell had a 7 foot opening. I did a little work and came up with a passable door and opening. Details added included a Details Associates BW6402 brake wheel, Kadee true scale 58 couplers, Walthers trucks, Tichy wire grabs, Detail Associates 6215 coupler lift bars, Plano 40 foot steel running board no. 191 and ladders-tack boards from Peters parts box.
The colour on the prototype photos we had to work with gave the impression the boxcar red was more of a rusty colour. I decided to paint mine a mix of Floquil boxcar red with a little rust added. Once a gloss coat was added I used Champ Decal set HN-19. A coat of flat finish was added followed by chalk and weathering powders.
 |
| Peter`s model reflects the late 1950`s era. |
P&LE 5703
Peter decided to model his boxcar as it looked in a late 1950`s photo from a Montford Switzer article found in MR Aug. 1993. Pete used mostly the same details parts as I used although he had a different brass etched roof walk than I did. Since it was not packaged I do not know the heritage. I did the painting and weathering so the comment above are for both cars. Peter lettered his car over the summer using Champ set HB-321...on to the next car...George Dutka
Friday, 16 November 2012
Priming Metal Castings
 |
| A group of my metal details and figures have just received a coat of Floquil SP lettering gray. I normally use Floquil Grime for this job. I did not realise I had ran out until just before spraying. |
Coating metal details with Floquil Grime
I find that if I first base coat my metal casting and use washes of stains and paints the details do not get lost in the mix. I normally give all metal detail parts a light coat of Floquil Grime. I let these dry for at least a week before applying any other colouring. My details normally dry longer than that as I have a container full of parts waiting to be use. Many details can be stored for months or years before washes are applied.
Once dry, I then use washes (a mix of more thinner than paint) of the primary colours followed by a dusting of chalks and powders for highlights and shadows. In some cases I have got good results using Hunterline weathering stains as a light wash over the primed castings. When I am out of Grime, which just happened this past week, I substitute Floquil SP lettering gray for the base coat, which is my usual primer coating...George Dutka
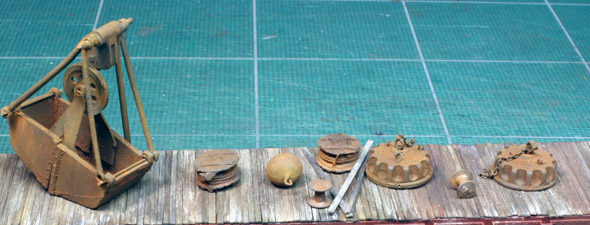 |
| Some of my primed casting have been weathered with chalk and weathering powders and will be loaded on my work flat. |
I thought I'd add another option to George's priming technique. Many years ago when building my first Fine Scale Miniatures kit, the instructions suggested priming all of the metal castings in the kit with Floquil Earth or Foundation and letting it dry for several days until the paint was cured. After they were completely dry you could paint them or stain them the desired colours. One FSM technique I have used to this day is for weathering castings that are to represent wood such as barrels and crates. Add a few drops of Floquil Grimy Black in a small jar of thinner (lacquer thinner or similar), mix thoroughly and apply as a wash to the "wooden" detail part in several light layers. The black in the wash will run into the grooves of the wood which will define the individual boards and give the entire casting a weathered wood look.
Recently, depending on the detail part I am going to paint I have added a little Floquil Grime to the Earth to add a little gray but still maintain the natural wood colour that the Earth or Foundation will provide. I find that Floquil paint is the best primer and will work well with whatever wash I choose...Don Janes.
Wednesday, 14 November 2012

Tuesday, 13 November 2012
Wordless Wednesday's
Beginning tomorrow, every Wednesday I will be posting a model or prototype photo that I hope tells a story. A photo that can stand alone. There will be no text, just the photo, hence the title Wordless Wednesday. It might be a railroad scene or highlighted details that can be inspirational for modelling, a diorama or a modelled kit . It may even be projects at my work bench or photos of water scenes that one might want to copied in miniature. Since I like taking photos in various settings I found not all of these shots can fit within articles and might be nice to just view. So check in on Wednesday's and see what I have dug out of my files...George Dutka
Lex Parker's On3 Layout
A D&RGW On3 Layout
HOMES Layout Tour...by Don Janes
 |
| A D&RGW 2-8-2 makes its way over a wooden trestle giving the crew a great view of the water falls below...all photos by Don Janes |
One of the highlights for me on the Nov. 3, HOMES layout tour was visiting Lex Parker's fabulous D&RGW On3 layout. His layout focusing on the Chama, New Mexico area. Lex lives in Beamsville, ON and his 18' x 35' layout is located in a very neat, nicely finished and well lit basement. The layout is free standing in the middle of the room. As one enters there are several operators running trains around the layout at slow prototypical speeds. They were very friendly and when asked, would stop the train so one could take photos.
My first impression was WOW!!! The trains and scenery were absolutely beautiful and what really caught my eye was Lex's hand painted backdrop representing the Rockies. Having just visited New Mexico and riding the the Durango & Silverton RR (ex D&RGW line) in Durango, Colorado in April I can say he captured the scenes perfectly. The way Lex has built the layout and painted the backdrop I felt like I was really standing along the tracks looking at the railroad with the Rockies and blue sky in the background. Simply stunning. If you are planning on attending next years HOMES layout tour and Lex's layout is open make sure you put it at the top of your list of layouts to visit.
 |
| #486 is making a quick water stop at Chama,NM as # 461 waits for her next assignment. Below #486 won't need water at this remote tank amongst the Pines and Aspens. |
  |
| The dramatic backdrop in this scene makes one feel they are standing right beside the tracks and smelling the oil and coal smoke |
 |
| As their caboose crosses a wooden trestle, the crew is getting a great view of the mountains in the distance |
Sunday, 11 November 2012
Richard Chrysler - Layout
 |
| An overall view of Port Dover, one of the new scenes on the layout. |
CNR Hagersville Sub - 1950
HOMES Layout Tour
The first stop on the HOMES layout tour last Saturday was Rich and his son's Geoff Chrysler layout. I was shocked to hear of Rich's passing this spring. I had seen him a few times last fall and during the winter and all was well. This open house was a tribute to Rich's accomplishments. Arriving at his home I visited with his brother Roger and some of his close friends including Clare Gilbert of Sylvan Scale Models and Pierre Oliver of Elgin Car Shops to name a few.
Rich's layout is a 18' by 30' two level HO scale line in the Hamilton to Lake Erie Ontario area set in 1950. The track is 90% done and scenery is in place at all locations although they say it is only half finished. The engines I saw operating all are DCC and sound equipped. The scenes are all prototype based with photos of the actual location posted below. Track is all hand-laid.
 |
| The CNR main line is seen crossing the NYC. Rich did a great job blending the foreground into the background. There is not a lot of room beyond the main line. Most of this area is painted on the backdrop. |
 |
| Rich's brother Roger operates a local during the layout tour. Roger is now retired and can be found working a couple of days a week at Credit Valley Railroad Co. a hobby shop near Toronto. |
 |
| Rich did a great job blending building flats with painted structures to give a narrow shelf depth. |
 |
| Another example of how structures added to the backdrop look real. |
Saturday, 10 November 2012
Modeling a Corn Field
 |
| Ross Oddi's 1949 era layout included a nice farm scene. This is a narrow area that looks much larger than it actually is. The barn was just painted on the backdrop. |
Ross Oddi's
Corn Field
One stop on the Hamilton Layout tour was at Ross Odd's home in Beamsville, Ont. A scene that caught my eye was a small corn field. I asked Ross about his field. The corn stalks are by Busch #189-1202 which he twisted to random shapes then dipped the tassel's in the flocking that is included. He mentioned using a number of packages. There are a good amount of corn stocks in each package. The background barn Ross hand painted which I thought he did a great job of. The ploughed field is cardboard which has been pulled apart and the inside ribbing used. The ground cover is dirt and dried out tea...George Dutka
Friday, 9 November 2012
Scenery Base Colour
Yesterday Peter Mumby and I got together to watch the DVD from this years Fine Scale Model Railroad Expo and a second DVD about scenery made by Doug Foscale of FOS Scale models Fos Scale Models, Uncommon Structure Kits
. What I noticed in the DVD's was Doug using black for his base colour while modelling for the ground and water bases. Doug did add a lot of ground cover...a lot more than I do. I am not sure if any black would actually show through anyway. He does not mention why he used this colour, but after some discussion with Peter we both though that black is used in many applications to create shadows and subtly hide details one does not want others to view. I think I might just give it a try...George Dutka
Thursday, 8 November 2012
White River Division Layout - Scenery Base Colour

Base Ground Colour
on the White River Division
Recently I had a conversation about base colours for scenery. The colour one puts on before the ground foam and dirt. I have used a few base colours over the year that either are miss-tints purchased really cheap or left over house project paint. All are flat latex. My thought is one can use a range of colours that resembles a dirty muddy mix. One need not agonise over the exact colour since a good amount of it will be hidden by ground cover anyway. On my layout there is two different colours used as a base coat and I could not tell you were one ends and the other begins.
My current base coat mix for dioramas and renovations to the White River Division is our living room - dining room colour. Hard to believe the colour choice my wife made also works for the layout...I will not tell her that. This paint is a Benjamin Moore paint and colour, HC-77 Alexandria Beige in Ulti-Matte finish...George Dutka
 |
| One can see the colour I am currently using from the side of the can. |
Tuesday, 6 November 2012
New London, Ct. - The Great Hurricane
 |
| A New Haven company photo showing the damage at New London, Ct. after the 1938 Great Hurricane. |
It has been a week since hurricane Sandy hit with much damage to New York City and New Jersey area. In Connecticut to the north it was felt to a lesser degree. New England did get hit by a greater storm back in 1938. I recalled a New Haven RR company photo from that era that tells the story well.
The New England Hurricane of 1938, Great New England Hurricane, Long Island Express or simply the Great Hurricane was the first major hurricane to strike New England since 1869. It remains the most powerful and deadliest hurricane to date in New England history.
This hurricane hit on Sept 21, 1938 and took over 600 lives. Rescuers in Mystic, Ct. found live fish and crabs in kitchen drawers and cabinets while looking for survivors. In New London, Ct. one saw winds and storm surge that brought Tulip ashore into the New Haven RR yard as seen above. The waterfront business district in New London caught fire and burned out of control for 10 hours. In New York City wind gusts up to 75 mph blew throughout Manhattan causing the East River to flow three blocks inland. The wind reportedly caused the Empire State Building to sway a bit...George Dutka
New England Covered Bridge Data
Vermont Covered Bridges
The inside story...
I just received John Kanakos Junction Gang News which included a link to a Covered Bridge Manual. It is a 346 page document with photos and measurements mostly of Vermont covered bridges, dated April 2005. This data might help one out with building a model....try the link below...George Dutka
http://www.fhwa.dot.gov/publications/research/infrastructure/structures/04098/04098.pdf
04098.pdf (application/pdf Object)
Monday, 5 November 2012
Mt Albert Scale Lumber Co.
 |
| Mt Albert's O scale kit offerings are seen as we walk in the front door. |
HOMES - Hamilton, Ont. Layout Tour
Mt Albert Scale Lumber Co.
On Saturday Don Janes and I participated in the HOMES layout tour. One of the stops was at the Mt. Albert Scale Lumber Co. We did not know what to expect but it was well worth the visit. Entering the shop which is now in Stoney Creek, Ont. a nice display of finished O scale kit offerings are on display. We are greeted as we enter by one of the staff who gives us a quick speech on the kits and the scale lumber warehouse just through the first door. A tour of the wood working shop was about to begin so on through the next set of doors to the shop.
 |
| Don Janes views the stripwood stock room. |
 |
| Mt Albert Scale Lumber Co. owner holds a block of basswood as it looks before the process begins. All the basswood begin as 24" lengths. He gives us the run down regarding were the lumber comes from and quality that is expected. |
 |
| An overall view of the stock wood in the rear and one of the machines is cutting two basswood blocks at one time into strips. All machines are computer operated. |
Subscribe to:
Posts (Atom)