Saturday 30 March 2019

Alder Barn Colouring

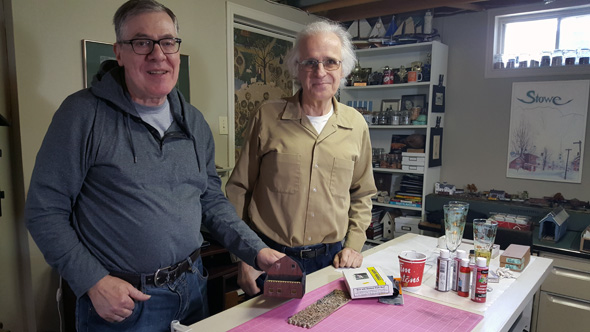
Peter holds Mark's barn as I snap this view with my phone. We thought the wall turned out really well and a good start for Mark to work from.
Last Monday's workday with Peter included another local modeler. Our friend Mark stopped by for some tips on how to weather his Alder Models barn. He had glued the walls and flooring together and painted it flat black. The instructions are poor leaving him wondering how to colour the walls and flooring.

I helped him with one wall and a section of the flooring which he liked and will continue on with at home. Here is what we did.

I painted the wall using a sponge lighty applying a coat of dollar store red and brown mix. This gives one a base coat to apply chalks and powders and is not that important to get good coverage or the right colour. It is a base to work with. I decided to begin with Bragdon used brick which is a nice off red. Once the wall were covered including the window areas I began highlighting the walls with red chalk. The chalk is a bright red so it is blended into the used brick tone. To finish off the wall we coloured the window trim using a micro brush and PanPastel white. The white gives a nice weathered paint chipped look to the windows. Now to see how Mark makes out on the other three walls...George Dutka

I am away tomorrow at the Woodstock train show, so no post hence a second post today.

One wall done three to go.

Railfanning Southwestern Ontario

On February 22, 2019, the day of the Copetown RPM Meet, the noon break offered us two choices - stay in the hall and eat purchased pizza slices, or head trackside with a brown bag lunch.  Our reward for going with the gourmet PB&J sandwich option was catching Via #72, engine 6416, just as it started down the Dundas hill towards Bayview Junction.  This was the first time we had seen one of the F40PH-2 units in the Via 40 scheme.
Over the last few months Peter and I have got out and done a lot more rail fanning than in past winters. It just seems like we lucked out on our various outing to RPM, WOD meets and train shows. We also have been out on other sunny days traveling around our city with a camera in tow which can yield some good results. Here is what we came across. Peter's photos are noted...George Dutka

After the Ingersoll WOD meet on March 9, 2019 we got lucky chasing the OSR around town and Cami plant. Two switchers are pushing a cut of multi levels up a steep grade to the yard outside the loading facility.
Ten minutes before this photo was taken, this train was shoving back along the connecting track visible in the foreground.  Now operating on the Guelph Subdivision mainline, CN freight GMTX 2255 west is powering up for the run to Stratford.  To the left (north west) behind the camera is the West Kitchener enclosure holding two Go Transit trainsets awaiting their call to duty early Monday morning.  At East Kitchener, three more Go trains are stationed in a larger facility.  Trackage, ballasting, and signalling has been radically improved through Kitchener since Go Transit started operating this far west.  March 17, 2019...Peter Mumby photo
The Via presence at the Kitchener station is indicated by this sign.  In case the old francais is a little rusty, the English translation would be "The future is on board."  March 17, 2019...Peter Mumby photo
Usually when I am trackside with my camera, it is my inner railfan that decides what to photograph and how to set up a shot.  On occasion, however, the modeller in me takes over and picks a subject that would make for a simple, but interesting, layout project.  Such is the case with this Kitchener station name sign.  It is located on the north side of the Guelph Subdivision mainline opposite the Via/Go station.  Late last year CN resumed control of this subdivision after more than twenty years of GEXR operation, so it is interesting to note the small orange GEXR logo to the left of the Kitchener name.  March 17, 2019....Peter Mumby photo
Via 6431 is blowing for the crossing at mile 7 of the Stathroy Subdivision en route to its next station stop at London, Ontario.  Adding colour to the consist is engine 904, still sporting Via 40 labelling.  Lots of power for a four-car consist!  March 20, 2019...Peter Mumby photo

CN London yard at the Top End (east end of yard). An engine idles most likely used as the local switcher earlier in the day. March 27 2019. CN 4803 is one of two GP38-2 in this group built back in 1973.
CP London local switcher running back to the east end of the yard on March 27, 2019. CP 2227 is one of 60 re-manufactured engines from GP7 and GP9's. They were delivered from July 2014 to Jan. 2015.

Friday 29 March 2019

32' Round Nose Van Trailers - Sheepscot Scale Products

Peter's trailers are on the right with a bit of weathering applied using PanPastel blender. Mine are not weathered yet and on the left.
Peter and I finally finished our truck trailer projects a few weeks ago. They turned out really well and was a real learning experience. We purchased the trailers from the Bob Bowes estate. Normally I buy things like this and just store it away for a decade or two but I left it out on my workbench as a reminder it could be our next Monday workday project. It took us a bit to get it completed as we worked on other projects in between. We also had to plan on a lettering and paint scheme.

These trailers are plaster castings with metal castings. I had not done any painting on cast plaster before so this was going to be an interesting project. All my experience in the past has been with stains on rocks and stone walls.

Painting the Trailers
One of Peters trailers was already painted but green, we wanted them all to be red. Since I was not sure how the plaster would take paint I tried a few different approaches. The green trailer was painted with a solvent based red spray bomb. It appeared to attach well. The other trailers are kind of chalky and I was not sure what paint to use. One trailer I brushed with dollar store Christmas red mixed into deep red while another I tried brushing Floquil caboose red. The Floquil paint just lifted off so not a good choice. The dollar store acrylic seemed to be a good choice as it appeared to stick well but the brush strokes did show especially since it needed three coats. By the time the gloss coat, decals and flat finish was applied this was not very noticeable. If you look closely there is a bit of variation in the trailer colouring.

 Christopher Creighton stopped by for a visit this winter on one of our Monday Workdays and I asked him about painting plaster. Christopher is the owner of Schomberg Scale Models which produces structure and details made from plaster. He normally soaks the casting with water and adds the first coat as a wash, meaning the acrylic paint is watered down a lot. He keeps building up the coats which could be numerous till the desired colour is reached.

 The captions tell the rest of the story...George Dutka

Here is what comes in the box and ready for paint. The metal parts are spray bombed with Home Hardware Camo Coat dark brown.
Peter on one of our workday Mondays drilling holes required on the underbody. Peter was using a Mini Metal trailer as a guide since the instructions are actually poor.
The rims are coloured using red chalk.
The kit came with some black construction paper that we used to make the mudflaps. I added Ontario commercial license plates for 1951 or 1958. Both years used the same style of plate. The roofs are brush painted with dollar store silver. Two coats are required.
My two finished models.
Peter Mumby's model. The trailers got gloss coat prior to decals being applied. This was followed by a coat of flat finish once decals are applied. All decals used are currently available from Black Cat decals and are from locally based company's. My uncle worked his whole life for Husband Transport located in London and only a few blocks away from my parents home when I was very young.
Trailers at work in Bellows Falls, Vermont on the WRD.
Another view of an Ontario line trailer in Vermont.

Thursday 28 March 2019

GMD Recollections - Visitors From South of the Border

GM FT demonstrator set 103 catches the late afternoon sun on the north side of the GMD plant on June 16, 1990.
By Peter Mumby.

The locomotive that killed steam - GM's 1939-built FT demonstrator units that barnstormed the US and convinced railroad executives that diesels represented the locomotion of the future.  Fifty-one years later FT A and B set 103 was still in existence and able to make the trip to London, Ontario to help celebrate the 40th anniversary of General Motors Diesel.

Tuesday 26 March 2019

Snapshot - March 2018

B&M Mechanicville, NY.

I look at Mechanicville yard through the photos taken by Bruce Nelson back when things were still happening in town. Don Janes and I stopped by last fall and it is hard to believe most of this fits in the area that is mostly weeds...George Dutka


Yardmaster's view of class yard. That's the lower end switcher on Trk 18. NE-84 is made up Trk1 on left and first half on NY-10 on cripple track lead/Trk36 on right. Metal building on right house the air compressor for "yard air". Retarder operator tower also on right. There used to two towers when class yard had 36 tracks. Switches were electric and fast action and operation was not protected by track circuits. It was possible, "but never happened" to throw the switch under a moving  car, March 1976

Retarders operators view 1976.

The two units in the clear are the hump switcher, March 1976.
Two of the seven retarders.
The B&M engine house is seen in the background in March 1976

B&M 1213 lower end switcher works the east end of class yard. March 1976.

Monday 25 March 2019

Another Rutland Ry. Flat Car Model

My model was built from the F&C resin kits for the NEB&W and given a load of cut marble pieces in crates based on a few sketchy prototype photos...Bill Gill
I recently got a photo from Bill Gill of his Rutland Ry. flat car built and lettered for the NEB&W layout, enjoy....George Dutka

Sunday 24 March 2019

East Deerfield Covered Bridge

The B&M East Deerfield, Ma. old-old railfan bridge. I think it is kind of neat and maybe worth modeling. It was known as a McCallen's bridge, a A148 style. Built in 1906 it was 74 feet long and was replaced in 1950 by the old Railfan bridge we all know. I have not been by there in over a year, I am thinking the new version should be now in place...George Dutka

 S

Saturday 23 March 2019

Rutland Ry - Flat Car Model Kit


Two Rutland Ry flats with marble loads ready for pickup on the WRD.
Years ago this Rutland Ry 36' flat car kit was released by the Rutland Railroad Historical Society. It was produced by F&C and I picked mine up at a RRHS convention back in the late 1980's or early 1990's. There was a whole line of Rutland Ry cars offered back then and a great era for Rutland Ry. fans.

The Rutland Ry. 2600 series flat cars have a long history dating back to 1902. 100 of the original cars shortly after being built were sold to the New Haven. Some were rebuilt as coal cars and others placed into company service over the years. My research into these cars have the last 46 cars being rebuild in 1942 and numbered 2600-2645.

The flats come in two packs. I built one of mine as a tool car which was covered in a post a few years back. Check the sidebar search. The other two Rutland Ry. flat cars operating on the WRD are ones I purchased from my friend Warren Dodgson a decade ago. Warren and I used to get together once a month working on kits such as these flat cars. When I got a chance to acquire some of Warren's equipment including these flats I jumped at it. Warren was getting out of modeling at that time. On Warren's flats I have added some weathering to the car sides and powders and paints to the deck to better reflect my current fleet's look.

F&C still offers this kit on their website if one is interested...George Dutka

A Rutland Ry. flat car kit still in storage waiting for me to build it.
A close-up look. The kit also includes there really nice looking marble loads. I glued the blocks to the wood supports, but left them unattached from the flat as I can use them as empties also.
The decks are weathered up a bit. In future I would replace the molded decking that one glues on with actual wood decking.
Two marble loads are resting on Rutland Ry. 36' flats. A Rutland RS-1 is about to pull them from the spur on the WRD.
My kit built as a work car is posed on the WRD.
The interior has a bit of equipment added.


Friday 22 March 2019

Rutland Ry. 2600 Series Flat Car

Rutland Ry. flat car with the deck stripped and looking it pretty good shape.
While visiting the Danbury Railroad Museum I noticed an old Rutland Ry. 36' flat car in the back area. The deck was stripped and a good look at the piping was seen. I built a model of this car which is still offered by F&C. Back in the 1990's this flat was found in the Bellows Falls yard and I spent sometime looking under it to get my models under-body correct. I did a drawing back then. I will have to look for it to check and see if what I see now matches what I had drawn up back then....George Dutka

Danbury, Conn. May 27, 2015


End view

Thursday 21 March 2019

Central Vermont - Hopper

A very short CV stone train heads back to WRJ.
I finally finished my CV hopper last week...it has been on my workbench for months waiting for a decal to be applied. I began the coverage back last fall and have decided to re-running some of the photos as a reminder...George Dutka

The prototype photo that was my inspiration for my model.
Bob Bowes completed model I purchased from his estate. It is nicely built with may add-on details. The  lettering was  easily removed. These are the  raised panel that I used.
This is an Accurail model that Bob added cut levers, stirrups, grabs and brake line piping. It was missing the brake wheel. I added a resin one from my stock but later changed it with a finer looking Kadee version.
The trip pins to the Kadee couplers are trimmed off. The raised paneling needed some cutting and shaping to follow the prototype photo.
The hopper is painted Floquil boxcar red and the lettering is a mix of CV boxcar lettering I cobbled together.
The second CV hopper is a factory painted Accurail model that I weathered up a number of years ago.
Some switching on the WRD at the coal shed on this trip.
My hopper has been weathered using PanPastels and Bragdon powders.