Friday 31 January 2014

WRD - A Look at White River Junction

Currently the WRJ station is viewed from the B&M side. The ball signal is at the left side of this photo along with the diamond crossing. The track in the foreground heads north to St. J. The B&M caboose is on the tail end of a Westboro bound freight. In the foreground a young boy waves at his dad at work while mom looks on.
White River Junction is looking a lot better now.

I took these photos about two weeks ago...thought I would share them with you. It is a newer look to the town and yard. Since the time of the photos I have added a few more structures and details, but have yet to take any more photos. I have most of the Westboro scene together now. I did decided to use a portion of the RailroadKITS "Fisher Fuels" in this scene. I also thought that my new BEST Elwell freight house which is included with the general store offering works better in place of the Westboro station. It will be a removable module so the station can be built and dropped in from time to time....George Dutka

This is how the CV coal tower area of WRJ yard currently looks. Since I took this photos I have added a structure similar to that of the old  two floor CV yard master-operator building. For the foreground roadway I actually used some cinder-dirt mix found in the WRJ area.
I added a drop in module along the WRJ yard outside edge. It is actually about half way down the yard. If one hangs a right at the mailbox you will arrive at the B&M WRJ yard office.
One of the section shanties is of CNR heritage similar to those used by the CV in the WRJ yard. The CV had a few of these shanties scattered around White River Junction. The CV also had an old wooden boxcar right next to one shanty. Mine has a B&M wooden boxcar next door for the time being.

Thursday 30 January 2014

Whats in the Box No. 5

The box, instructions and all the parts included in the kit are seen in this photo.
BEST B&M crossing shanties
At a recent model RR show I picked up the BEST B&M crossing shanty two pack for a great price. I was going to build a copy of the Inwood flagstop but this is going to work out better...George Dutka

Tichy windows and a smoke stacks are included in the kit. Note the roof cut outs.
The roofing and window canopy can be seen on top of the instruction sheet which views how one of these buildings looked. The kit also includes cross bucks.

Monday 27 January 2014

Inwood on the WRD

A B&M freight head towards Bellows Crossing with the Inwood flagstop in the foreground.
Flagstop in service now
The Inwood flagstop is now in place just outside of Fairlee/Bellows Crossing (depending on the drop-in installed). Here are a few views of the scene...George Dutka

It appears there is a paying customer for the White River Division. Hope she is going for a long ride...I need some more funds to get Westboro in shape.
The flagstop is only a short walk from the crossing.

Sunday 26 January 2014

Mile Marker 100,000

A B&M freight heads through the countryside towards the WRJ yard.
Sometime yesterday the mile marker of 100,000 visits to my blog was reached. Guess if you were in a grocery store bells and whistles would be going off and maybe you might get some free groceries. Anyhow, Don and I would like to thank you for following along as regular viewers of the White River Division blog. We have a lot of projects finished or planned that we are both looking forward to share. Thanks for your post comments...some have actually helped me recently. Keep checking in regularly and see what's up. If you get a chance join our blog members list. Don and I are always interested with who we are posting to...cheers...George Dutka

Saturday 25 January 2014

Modeling the Inwood Flagstop

The flagstop is almost completed. I still need to attach the station sign and add the window and door glazing. I cut down the platform to fit the location it is designated for.
The Inwood flag stop is an easy four wall, three windows a door and roof kit. Most of the basic construction took only a couple of hours. I began by adding some nail holes and pulling a few boards up. The windows and doors need some assembly also. The window and door glazing got a coat of flat finish to dirty them up a bit. The corner trim fits really well. The wainscot trim looked to wide for this structure. I used it under the eaves as face boarding. The new wainscot was made from HO scale 2 by 4 inch stock.

Once all the parts are attached I gave the whole structure a coat of Hunterline weathering stain. Once dry, I painted the top walls Floquil depot buff with an added coat of grime while still wet. The lower section, trim, door and windows are painted Floquil tuscan red with a touch of signal red added. I did this all with a brush. Once dry I used Bragdon powder lime white on the top portion and dark rust on the red sections. I printed my photo that I took during the fall of 2012 of the flag stop. I used the sign from this photo on my model. The base was cut to fit it's new home. I used Hunterline stain on the base followed by a few tints of Bragdon powders. I will show you the finished model in place on the White River Division once I take some photos...cheers...George Dutka

Link to Creative Laser Desgin  http://www.creativelaserdesign.com/


The main portion of the flagstop is now complete. The roofing is printed slate on heavy card stock. It looks pretty good. I used Canopy Glue for all attachments in this project.

Dark Rust was used to weather the lower portion of the flag stop. The roof got a coat of soot powder...dirtying it up a bit.
This is how the flag stop shelter looked in Sept 2012.
I used a print made from this image for the sign. It turned out to be the exact size without any changes made. I just cut it out and glued it above the door.
The flag stop is awaiting its new home on the White River Division.

Friday 24 January 2014

What's in the Box No. 4


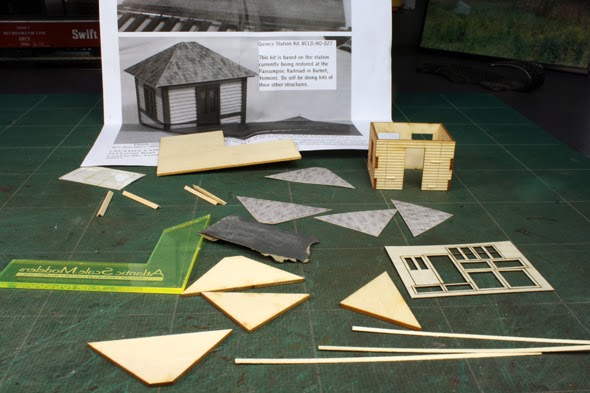
All the parts that are found in this kit are laid out as I begin construction. The parts are all nicely cut and fit together extremely  well.
The Inwood Flag Stop - Creative Laser Design

I purchase this small flag stop while away this fall. I have a great spot next to my pond that could highlight this tiny structure. An initial post and link to the RMC review can be found on Dec. 16, 2012.  I traced the wall and roof out before I began the kit so I can construct a second model as a B&M shanty at a later date. I would use it for one of my ball signals or in the yard. The kit is very simple to construct. I built most of the shelter in one short evening. The next morning I painted the walls and attached the roof. I will show you the finished model later this week....George Dutka

Thursday 23 January 2014

Swift 37' Reefer - Rapido

Last week Peter brought over my reefer order that has taken a few years to materialise. I compared my new model with one offered a few years ago by Atlas. The first thing one realises is the size difference. The Rapido model is much larger all around. I always thought the Atlas model was a bit on the small size. The details are finer on the Rapido car also. I will have to repaint the roof as I did on the Atlas model. The Swift roofs are boxcar red. The Rapido cars roof is actually a different red than the sides but not boxcar red. Another detail that differs is brake wheels and ladders. The Atlas has grab irons and stem brake wheel. This is the only version I have seen of this particular car. Maybe because the photos are pre 1950. The Rapido model has a more modern brake wheel and metal ladders. My guess is the ladders are upgraded at the same time as the brake wheel. I am not sure when, but I believe the old style of wheels was outlawed by the 1950's. The Swift model is a great addition to my rail car fleet...George Dutka

Sunday 19 January 2014

Caboose Storage Track


Currently there is a extra B&M caboose and CV flanger stored behind the carman's shanty. When they are required the WRJ yard job will dig them out.
I decided to store my excess cabooses, flangers and snowplows on the track behind my carman's shed. Since the carmen do attend to having these pieces of equipment ready when necessary...it just seemed to make sense....George Dutka

I added a stove oil storage tank near the caboose track. It still requires some paint touch-ups as it looks way too rusty at the moment. I don't want all that oil to leak out onto my layout from that rusty tank. The tank  is a Woodland Scenic product.

Saturday 18 January 2014

Progress on the Green Mountain Division- Slow But Steady

This old stone mill was a major landmark on the old layout and I was able to find a home for it on the new layout.

     The Benchwork is Almost Done- Whew!!....by Don Janes

     After getting the three staging tracks installed and wired with occupancy detectors and adding the mainline along the north wall of the new layout expansion I decided to forge ahead and finish up the benchwork so I could get some more track down and move one step closer to starting some scenery.  After considering various track plan options to create a continuous run and changing my mind several times in the process I decided to run the mainline through the furnace room and and across the doorway via a drop down section.  Thanks Pierre Oliver for helping make up my mind on this. It's a long story as to the various scenarios I had worked on to obtain continuous running, but in the end the drop down section at the doorway won out over having return loops at each end of the layout.  I just didn't want to take up a 3' x 8 foot chunk of my workshop for one loop that would be always covered in dust.  With that being said, the benchwork I just finished will be primarily a dead end branch line that cuts off the mainline, runs down the south wall and swings down a peninsula to a yet to be named town. 
     I decided that when I built this new layout there would be no aisles less than three feet wide and so far I have been able to stick to that.  I may widen the end of the peninsula but that would only be about four or five inches at one end where there won't be too much traffic..  The peninsula will represent a small town that sports several industries that will be served by rail and add some switching to the layout.  I am just in the process of deciding what those industries will be.  The curves on the mainline are 36" and 40" but I had to drop that down to 30" on the branch.  Still not too bad.  All the turnouts are a minimum #6.
This view from the doorway shows the new benchwork along the far wall and the wall to the left that ends up as a dead end branchline on the peninsula.  All the aisles are three feet wide- so far.  All the structures on the left are just being stored there.  This area will be open country side when complete.

I was able to find a spot for the stone mill right at the room entrance.  It will have two sidings to switch.  The room door will be removed.
     One of my favorite structures is a large stone mill I scratchbuilt from only two wall castings that my friend Dick Elwell gave me years ago. I had my doubts if I would find a spot for it on the new layout but finally found an empty space right as you enter the room. It is a large structure measuring about three feet long and one foot wide and weighs a ton due to its hydrocal construction. There will be two tracks serving the large stone mill and they will cut off just before the curve that takes the branch down the peninsula.
     All the new benchwork is standard "L" girder construction with risers to support the road bed.  This is a very versatile method that allows changes to be made easily.  I have used sheets of 1/2" plywood for the table top so I can layout where everything will go then once that is determined I will start cutting it out for various low areas and a river I have planned.
This view shows the new peninsula with the various structures being tested for location.  The mainline and staging tracks are on the north wall on the right in the photo.

Here are a couple of views of the peninsula looking towards the entrance of the room.  Note the location of the stone mill in the top photo.  These photos gives an overall look at the layout of the room.
     So there you have it.  The Green Mountain Division is slowly progressing.  I'm now getting ready to hand-lay the track and turnouts and will post an update in the near future.

Carman's Shed for the White River Division

The White River Junction carman's shed is now in place. As a joint B&M - CV facility, the CV crew brought over there stove and CNR stack for winter heat. I also added a B&M placard to the boxcar door. It was reduced from the full size prototype.
I needed to add a few shanties to my rebuilt WRJ yard. I decided to make the carman's shack a boxcar. I used a Walthers-TrainMinitures outside braced shell. I took off the doors, trimmed off the over scale stuff and attached opened enough to add a caboose door. The ends are cut out and a piece of styrene is added to emulate the B&M style of ends. I was not worried about the details on the ends as boxcar doors and ladders covered most of it. I replaced the roof walk with broken pieces of styrene and a CNR caboose stack. I glued on a bill box and a small window. I did not cut out an opening for the window as I would just blacken it out. Both the door and window got a styrene overhang. The whole project to this point only took half an hour. I actually spent more time painting lettering and weathering the car.


I painted the boxcar Floquil Tuscan red. The B&M logos are from Walthers while the lettering are just left over CDS dry transfers. I was not worried about the numbering as I only added a few numbers. The decals went on without any gloss underneath and did not get any dulcote over top which still worked out well. Once the decals and lettering was on I just applied a lot of weathering using Bragdon powders....George Dutka

This shed turned out to be an easy build using whatever I had on hand at the time. Note the broken roof walk, the styrene ends and ladder attached. A caboose door was used as an entrance.
A test fit at its new home. I still would need a good amount of details scattered around to bring it to life.
The finished scene...now that the carman are well supplied...they can get to work on the rips found around the yard.


Friday 17 January 2014

Adams, Mass.

The mill could make a great model. The tracks are all gone now days and converted to a walking/bike trail south of town.
A look around Adams, Mass.

Don and I spent a rainy day in Adams taking a few photos of what we saw in town. This was during our Thursday visit to Dick and Frank's layouts who live in town. One can find many more building than what you see here, but with all the rain another trip is due for sure. Hope you can find some inspiration here...George Dutka

The top portion of the mill were one could get feeds and coal. Love the weathering job.
This stone structure looks like it inspired a few model railroad kits.
The rear wall show the structure is not in that great of shape. Note the up and down sensor bars that record any changes in its condition. It really surprised me that all the top windows on this side and those on the front are all new...not a good investment to a structure that might come tumbling down. The front stone wall has a good bow outward also.
This is one of the back corners of the structure. Not sure if I would want to be standing inside at this end of the building. Did I mention there are new windows above. This wall could make some neat modeling though.
I took this shot from Don's car window at the local Dunkin donuts parking lot. Adams has a lot of company row homes as seen here.
Here we see a sub shop which has been around since 1958. It is located across the road from the ROW. I wonder how many train crews have stopped here for a sub over the years. It could make a nice model also. As one can see it was pouring out.
The freight house is found in the bushes next to the feed mill.

Sunday 12 January 2014

Bellows Crossing Swap

My Fairlee frt. house is now located at the site of my Bellows Crossing station.
I had rebuilt the Bellows Crossing station as a drop in structure so I can change the scene around when the urge arises. I guess the urge did arise. I trimmed my Fairlee frt. house to fit this location this past week. Gatorfoam is hard to cut when there is a model and details attached, but I did it. I really like the looks of the frt. house at this location and I think it will stay there for awhile....think the town might get a name change too...George Dutka

An overall view, note the new crossing shanty in the background.
The structure in the background will be changed out with my new South River Mill once completed. This town will then be completely reborn.

Saturday 11 January 2014

Broadway Limited - Crossing Tower

A busy day at Bellows Crossing with a B&M freight arriving in town. Hope that tower signalman gets down to the crossing in a hurry as the train is almost there.
 New Tower added to White River Division
I added a crossing tower to my Bellows Crossing scene recently. I purchased a brass Broadway Limited tower while away this fall. I covered Don's tower in a post of Oct 25, 2013. The Broadway towers have not been available for some time, but I did find one at a hobby shop while away. Mine is unpainted and corroded in a few spots. One being the screws that hold the tower structure to the legs. There are two screws below that I could not even see that I had to drill out to get it apart for painting. I had to ask Don how he took his apart before I realized there actually are screws.

Crossing tower just out of the box.
I primed my parts and tower then painted it Floquil Tuscan red. The roof got a coat of grimy black. The stack and lights are painted old silver. There is a stove inside that got a coat of black paint. A Woodland figure was added for interior interest. I added some clear plastic to the windows and doors. The whole structure got a good coating of Bragdon weathering. This is a simple project which took no time at all to complete. Once in place I added a garbage can, coal bin and shovel for the tower crew. Hate to see them get cold during the winter. Since I have yet to add crossing gates, I placed a stop sign for the tower tender to use...I think he will be having a long talk with me shortly if I don't get some gates installed...George Dutka

The tower is all painted and about to be assembled. I did add a figure to the interior.
The crossing tower is now in use on the White River Division. Note the crossing sign which is being currently used till the proper gates go in.