Saturday 29 June 2013

Wells River, Vt. - Section House


The Wells River section house still stands in 2012. It appears a newer steel roof has been applied at some point..
During the fall of 2012 I spent some time taking a look around Wells River, Vermont. I was surprised to see the old section house just north of the Wye and on the east side of the tracks still standing. It is kind of hidden in the brush and seems in fair condition. I did take a few measurements so one can build a model. Width 15'3", Length 18'5", Height eaves 11'4", Height peak 18'8".  The peak height is estimated by counting the boards at 3.5" each.  Check out my detailed group of photos below...George Dutka

Trackside view.
The north end has weathered better than the front of the structure.
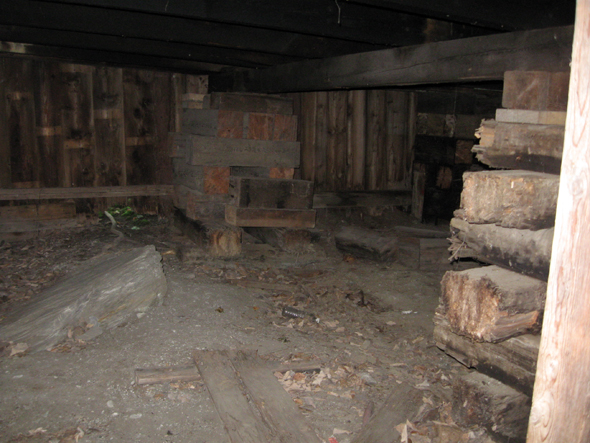
The ground slopes back from front to rear. The front portion of the structure rests on the ground. The back half is supported on wooden blocks as seen above.
The south side of the section house.
I took this photo through an opening at the mid-point of the building which views how the structure  looks on it supports. As you can see most of it is off the ground.
As you can see the interior is a mess. I am looking from the front door to the rear wall.

Friday 28 June 2013

Traveling Art Show


Last week in the Goderich paper "Signal Star" a full page feature covering tags or art put on rolling stock was included. Since they have summer time art festivals in the area they thought they would include the pier and salt mine spur located very near the main beach as destinations to view art. Below is how the article reads...George Dutka

"It is the best travelling art exhibit in Goderich, even if it bends a few rules. Graffiti artists' tags adorn many rail cars that make their way to the Sifto Salt Mine and South Pier's grain elevators, providing some colourful distraction in a long line of dull and rusting cars. The tags range from crude messages, to single-colour slogans to full colour proclamations of the artist's presence - saying, I was here in graphic style. Each day brings new exhibitors to town, and viewing is free for everyone."

Sunday 23 June 2013

Snapshot - June 2013

CPR ethanol train awaiting a new crew at Lobo Siding, Ont.

Last month while travelling to and from my sailboat I cross the CPR mainline west of London, Ont. It is a meet location called Lobo Siding. On two occasions I came across a train waiting a re-crew. This gave me a good chance to stop and get a few photos. My favourite photo is the one above that I took with my little Olympus Tough camera. I took the photo from low down. I was able to use the viewing screen on the rear to angle the view.

This train is the westbound CPR ethanol train that many of you may have photographed operating in New England over the VTR. The train needs an idler car while operating in Canada and I believe it stays on for the whole trip...George Dutka


Saturday 22 June 2013

D&H Milk Car Model

A D&H train is re-routed over the White River Division. Just ahead of the caboose is a good looking D&H milk cars.
D&H Milk Car No. 827
The Prototype
The D&H milk car was a typical eastern area car. It was similar to those used on the Rutland Ry and NYC. These D&H milk cars are part of a group built in the company shops in 1906-1907. Plans of a D&H milk car can be found in the February 1986 issue of RMC. I believe that D&H car #848 seen in the drawing is of the car that sat in Tunnel, NY for many years as work car #34226. The same RMC issue also has a photo of  milk car #827 which is a similar car. A photo of the Tunnel, NY ex milk car can be found in the June 1974 RMC.

My model of D&H 827 was one of 67 cars in the D&H fleet which had been numbered 800-866. The cars are not all the same but similar. To model one it is best to use a prototype photo. 848 had a steel underframe near the end of its use but also retained its truss rods. At some point ladders to the roof walk were added.

I am not sure if any D&H milk cars have survived. The last photo I did see was of D&H #30043 at North Creek, NY in 2002.

F&C kit #2001 of a D&H milk car is found in use on the White River Division.


The Model
My D&H milk car model was built many years ago from an F&C ( Funaro & Camerleno) kit. This was one of the early era crude kits that are a solid block which needed a lot of sanding on the bottom to even things out. Many of the details also needed replacing. The line of F&C kits have greatly improved from these 1980s offerings.

I don't recall all I did but roof walks are styrene strips. The original walkway was very thick. I believe I used the end walks from the kit. I used some of the included wire for the hand holds. Kadee pockets and #5's are used.  The end ladders are from my parts box. I bend grab irons for each end and used a passenger car hose set. I don't recall the make of the metal stirrups used, but Tichy makes some nice ones that one could use today. The trucks are Athearn or Roundhouse express reefer trucks taken from an unused kit. I used the included under body details adding a small piece of chain. Most early era photos and plans view low level brake ratchet and no end and side ladders. As I model in the 1950's I updated mine with ladders and a high brake wheel. The brake wheel and brake wheel details I think came from a Details Associate parts package.

The roof, under body and trucks are painted my usual Floquil grimy black. The sides got a coat of Floquil Pullman Green. I don't recall if the decals were included or not. At that time I was using a lot a dry transfer lettering that I found at stationary stores. The milk car got a coat of flat finish and some light air brush weathering.

I am happy with my D&H milk car although it does not get added to my trains all that often. It is though a nice example of a Rutland-NYC alternate...George Dutka


An overhead view of D&H milk car. The roof walks were added along with the ladders for a later" in service" date. When build the roof had small circle vents, and hand holds grabs on the ends and sides, no ladders. The brake ratchet was lower down also.


Numerous NYC, Rutland and D&H style milk cars can be found in this yard photo. They all have a similar appearance.
D&H builders photos shows the row of openings along the bottom while other D&H milk cars had three on each end as seen on the F&C kit model .
D&H milk car plans

Friday 21 June 2013

June is Dairy Month in Canada

The Moos Facts
I discovered some interesting facts about dairying and cows recently. The local paper out by our marina is based on the rural farm area along the lakeshore. It notes that there are about 322,000 dairy cows in Ontario, averaging 60 cows per farm. Each dairy cow typically produces 30 litres of milk from two milkings per day. Cows give milk for 10 months or 305 days after giving birth to a calf. They stop milk production for 2 months (dry periodl) before giving birth. Once again the 10 month milk cycle begins…get those milk cars ready to roll…George Dutka

Monday 17 June 2013

MEC Low-side Gondola's - Ertl Model


Peter Mumby and I built these two Ertl models back in 2011. I covered these models in one of my very early blog posts.
Here is an interesting tid-bit. A couple of weeks ago on the NEB&W facebook page John Nehrich notes that the Ertl gondola was based on the MEC 9 panel low-side prototype...something I did not know. John also includes a good Bill Brigham photo of the prototype. Bill's photo views the gondola with a white herald and lettering....George Dutka

Saturday 15 June 2013

Green Mountain Division Expansion- by Don Janes

A CPR freight train is rolling along the bank of the White River on its way towards the new layout room.  The two lovers in the row boat don't seem too interested in the train....all photos by Don Janes
A New Beginning

     Since George is on the topic of rebuilding his layout I thought I'd throw in my two cents worth about the progress I have made on my new layout room.  As was mentioned back in the spring, I dismantled my original 12 x 20 foot Green Mountain Division layout which dated back to 1990.  This was my first layout and a great learning experience but after having worked on the new section I started about five years ago I realized I had learned a lot about building a layout.  One big lesson was that less track is more and I felt I had way too much track for the space I had on the old layout. I hope to have more scenery and just enough track on the new layout.  Some improvements I want to incorporate are more staging given the number of cars and locomotives I have accumulated over the years, minimum radius of 36" to 40" on the mainline and   #8 turnouts on the main and #6 on other tracks .  Also, I'm getting to old and stiff to be ducking under bench work so the new layout will feature a reverse loop at each end creating a walk-in layout.  This was not my favorite way to plan the layout but with my basement design it's the only way to avoid a bruised back.   Since I had about 85% of the new section done I figured it was time to rip out the old layout and start anew with ideas and techniques I had learned over the past 23 years.  I'm really looking forward to using all the new information I have learned and great new materials available to create a new improved Green Mountain Division.
     I plan to post updates as I progress around the room.  Right now it's down to the basement to lay down some rail.


With the help of Frank Henophy I installed the Masonite backdrop and painted it blue.  Hopefully I will be able to paint some decent clouds on the backdrop to add some realism.  The room has all new lighting installed also.

The first section of bench work has been installed and you can see where the two tracks will enter the new section.  I was able to salvage the  "L" girder framing from the old layout saving a lot of time and work.

The cork roadbed has been added and location for the turnout leading to the three track hidden staging tracks has been established.  Wide curves with easements keep the track work flowing smoothly.

The BAR boxcar in the distance indicates where the staging tracks will begin.  Hopefully they will have a twenty car capacity including two or three locomotives and a caboose.


The two main tracks coming through the wall along with the turnouts  have had wooden ties installed and stained.  I used Fast Tracks wooden "TwistTie" kits for the turnout ties.  The copper clad ties (see photo above) are used to solder the rails to.  This keeps the rail in gauge.  
The ties and turnouts have been installed for the lead to the three hidden staging tracks.  All the hand laid rail will be code 70 and the track to the left beyond the wooden ties will be code 83 flex track.
In the past week I feel like I have made a good start on the new layout.  At this point I will finish the three staging tracks the start to plan the route for the mainline and where various structures and scenes will be placed.  Right now I don't have a formal plan as I usually just wing it as I go and see what will fit in the available space.  Here I have placed one of my structures to see if it will fit in this area.


Tuesday 11 June 2013

White River Division - Update

The layout room as it looked yesterday. It was a rainy day here so I stayed home and started to put things in  place. My display case is seen to the right which had to be moved carefully back next to the new  furnace. I did leave everything in it and it appears to be OK. My file cabinet needs to be moved. The step ladder is in position to stuff back the insulation  at the vent hole locations.

I'm ready to move ahead
The White River Division has been kind of a mess lately. We finally got the water problems solved in the basement. It took me a lot of digging and patching outside to fix the main leak. The other leak appeared to be the window seals I hope. It has been raining yesterday for at least 12 hours and everything is still dry. At the same time as I fixed the leaks we had the furnace and air conditioner replaced. The air unit was sitting right over the spot I had to dig out for the leak. Being almost 30 years old it would not move well. So everything is new near the layout and I hope I do not have any issues for many years. All the venting also needed to be replaced which runs right over the WRJ area of the layout. Some holes through the outside walls needed to be cut also. As you can imagine a lot had to be moved and taken off the layout so that it would not be damaged. Once the fall comes I will be looking forward to move ahead with reconstructing the layout. The two photos tells the story...George Dutka

Much of the foreground and structures that would be in the way are seen removed. White River Junction will take on a new appearance once the fall arrives.

Monday 10 June 2013

Weekend Leftovers - June

 Odds and Ends
Took me till this morning to get through all my weekend e-mails. Here are a couple of interesting links I found included.

The link below may give one a better alternate option to Floquil paints.

Floquil

The link below takes you to a site which views a really great modelers version of a CNR scratch-built coaling tower. It is a mulit silo concrete and brick coaling tower (circa 1920)...George Dutka

Scratch built coaling tower | Model Railroad Hobbyist magazine | Having fun with model trains | Instant access to model railway resources without barriers

Sunday 9 June 2013

Summer Season - 2013


Well boating season is getting into full swing now. I have moved my boat to a new harbour due to low water and now have no Internet connection. Seems I am in an area that even cell and AM-FM radio service is spotty at times. It is strange to be in a lake basin which is so isolated only 1.5 hours from home. I guess my posts will be coming at times I am at home and have time to get something together. Have a great-safe summer with regular posting beginning again in the fall...George Dutka

Saturday 8 June 2013

CNR OCS boxcars in 2008


On this OCS boxcar two doors are added in the same opening. Mac Yard 2008.

A prototype look at CNR OCS equipment in 2008
Most of us modeller's when thinking of work equipment used by the Canadian railways think of the neat old 40 foot boxcars and other vintage equipment that were seen for many years in sidings across the county. These days here in Southwestern Ontario not much of this CN equipment exists and most work is done with modern hi-rail equipment that can be moved to work locations along the trackside roads that access the main line. Also the work crews usually stay in motels nearby if local crews are not used, eliminating the need of crew cars.

What is left now are some updated 50 foot boxcars that have been converted to OCS use as seen in these three photographs that I took in Toronto’s Mac Yard in 2008. They are simple conversions that can be done by replacing the sliding door with roll doors, a ladder for access and a commercial steel door. If you look closely you will note that one opening were the sliding door was removed, a smaller roll door was added along with a standard door both in the same opening. The other two cars had additional openings cut out which would have been extra work for the shop to complete.  
After building a fleet of regular service CNR boxcars these work cars may make a more enjoyable alternate project with easy to find detail parts. A nice group of these contemporary hard working cars could easily fill an unused siding on your layout.

All three prototype photos are taken at Mac Yard April 19, 2008. I took these photos from my engineman's window of train CN #435 departing the yard west to London, Ont....happy modeling...George Dutka

A new roll door has been added where the sliding door once was. A smaller home style door was cut into the side of the car. Note the ladder next to the door. This could make a nice modelling project.
The third conversion was the middle car in the group.

Sunday 2 June 2013

CV 50' boxcars


I believe the graffiti was applied using photos of a particular car.
When Peter brought over his engines and equipment I decided to take a few close-up views of the boxcars. What makes these cars stand out from others I have seen is the colourful graffiti and re-painted detailing. So let's take a close look at both sides of CVC 402157...George Dutka

The other side of the CV boxcar had new paint patches and stencilling applied.