Friday, 11 October 2013

MEC Section House

My finished model of a Creative Laser Design's kit I purchased at the 2011 Expo.

Creative Laser Design`s  - MEC Section House

In my very first post on this blog I briefly covered the MEC section house kit I purchased at the Model Railroad Expo 2011. I really liked the looks of the kit and thought I would give you a second look. The MEC section house kit was a new experience for me at that time. I wanted to try constructing a wooden laser style kits. All the structures I had built to that point where scratch built or resin model kits. The MEC kit was an easy build and since then I have completed more complex laser kit structures. The current plans for the MEC section house is to add it to my HOn30 C&Q Ry. junction yard scene. So lets look at how it went together.

The instruction sheet is seen behind the kits parts. One can see the Northeastern slate roofing and the interior flooring along with the other detail parts. The hand car is not included with the kit.
The basic wall sections have been assembled. The doors and windows are seen ready for painting.
 Lucky I saved a few notes as my memory is really short these days.The structure went together well as per instructions. I did not add any additional bracing since it was so small. I added Northeastern 1 by 6 trim under the eaves. I added hinges made from styrene cut as a triangle. A door handle was also added which is not included in the kit. The base or floor is painted Floquil grime with roof brown streaking. I then dry brushed some white and black while the floor was still wet. Additional chalk weathering was added later. The walls are painted Floquil SP lettering gray and the trim is Floquil  coach green and dry brushed Vermont green. I also hit the trim with a bit of green and black chalk to weather it up a bit. The included roofing is Northeastern Scale Lumber slate sheeting which is a really nice product to be included in the kit. The unfortunate thing is they do not give one enough roofing to built the model. When I fitted the roofing it was two rows short. The width was a bit more than need be and had to be trimmed. I used the trimmed shingles to make up the top two rows. These had to be glued on individually. There was no roofing cap strip included. The roof and walls got a light weathering of black and brown chalk. I added some glazing to the window and cut a paper bag blind.

I added an interior since I was leaving the front sliding door open. I also left the side door open. I put a hand car inside along with two Juneco section men. I added a few tools, barrels and crates at locations that they could be seen...a great little addition to my modelling scenes...George Dutka

The section house is seen separate from its interior flooring. I added a good amount of details were it could be seen through the open doors. I glued the two section together with a couple of dabs of Walthers Goo.

The interior has been added to the section house.

Tuesday, 8 October 2013

Snapshot - October 2013

Nothing unusual about this photo other than Don Janes catching me taking a down low photo of the CNR power that had come in on the Southbound freight. Don and I try at times to catch each other in the scene on our outings.
Visiting St. Albans

Back in Oct. 2010 Don Janes and I attended the CVRHS convention held in St. Albans. I was invited to attend the meeting on Friday evening regarding the the CVRHS  quarterly the Ambassador. Don and I arrived early at the head office where the meeting was to be and found the southbound had arrived in town. The power was run up to the office and the crew went inside for a moment. Well that was a good time to get a few different angles of the power. Don took this photo of me getting a down low view. I always like trying a low level shot when the opportunity arises...George Dutka

Sunday, 6 October 2013

White River Division's - Glory Days

This is how I would have envisioned Glory Days if it was held on the White River Division in later years.

  White River Jct. Glory Days
on the
White River Division

Each September White River Jct. Vermont hosts a festival called Glory Days. 2013 was the 21st year. It is a mix of food, fun for kids, music and railway displays. An operating passenger train is also included giving one rides north out of town. Well when Peter and I were in the process of shooting a contemporary display of engines on the White River Division I decided to hold my own Glory Days as would have been seen 30-40 years ago on my line...George Dutka

A pair of Guilford engines are posed for the local railfan...Oh I think that is me.
To the far right the Central Vermont shows off a nice clean looking S-4.  No. 8081 is a factory painted Atlas offering that I added numerous details to. A BAR geep is seen tucked in behind the WRJ station. Looking a little out of place it is actually in town on loan and adds to the colorful display.
These two Maine Central U25B`s are seen in two different paint schemes. They sure look good out front of the station. On the prototype these MEC engines did on occasion call on White River Junction.

Friday, 4 October 2013

Rutland Ry. Train Order Signal

One can see the train order signal clearly from a train approaching the depot.
  Scratch building a Rutland Ry. train order signal

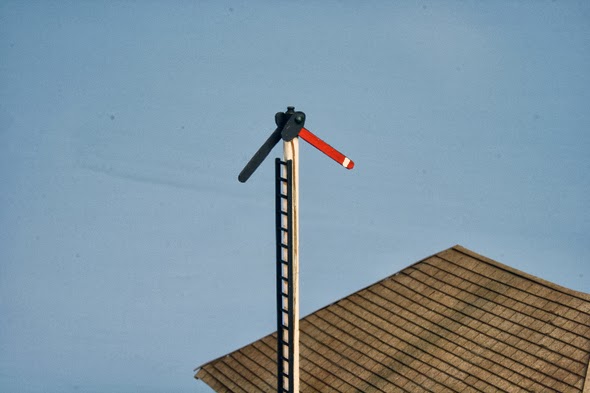
I wanted to have an example of the railroads order boards which operate on the White River Division. That would be the B&M, CV and Rutland Ry. They all are different or unique. For my Rutland Ry. Petersburgh, NY. station and my other model a Rutland Ry. combination section house-operators office modeled after the North Dorset, Vt. prototype, I built a order board  that reflects the prototype. I don't believe there is a commercial model available at the moment.


The two blades are constructed from styrene. I traced a pattern from a Rutland Ry. station photo. I enlarged the pattern to what I thought looked right for HO scale. I then transferred the pattern to thin styrene, cutting them out and doing a little sanding to smooth out the edges. For the light lens attached to the blade I just cut a very think sliver off a plastic model spure. The blades are painted Floquil engine black. I then painted the arm Floquil signal red. A white band is painted using reefer white. The light lens is painted Floquil coach green followed by a dab of glaze. The blades are attached using Walthers Goo and are added last or once the rest of the details are in place on the post.
  
The operator-section house is a replica of the North Dorset, Vt. prototype including the train order signal that was once there. Although the structure is a kit the signal had to be scratch built.
The signal post is made from stock 8'by8' NorthEastern Scale Lumber. All my train order posts are 30 feet tall. I scribed all the sides then painted it reefer white. The lantern on top is a Roundhouse #2951 marker light. I used wire for the rods on each side, which is painted grimy black. The ladder is Central Valley #1602 ladder package find. The ladder is also painted Floquil grimy black.

The project was a lot easier than one would think...George Dutka


Thursday, 3 October 2013

About Wordless Wednesday No. 45

Yesterdays Wordless Wednesday viewed a pair of tough looking structures. I took that photo as I thought it might inspire me to add such a view on my layout. It is always good to have a photo to work or inspire from. This structure still stood during the spring of 2012, in Lisbon, NY near the old Rutland Ry. ROW..it is hard to believe that something like this was left standing...George Dutka

Monday, 30 September 2013

CNR Flat Car Model

Rich Chrysler's two CNR flat cars in use.
At last years HOMES layout tour I took a few photos of Rich Chrysler's CNR flat car models. He had done a really good job. I had built a few models of other railways flat cars, but to date only have one CNR flat car in my fleet. I took these photos so I could use them as guidance while working on my own some day. Thought these views might be of inspiration to you also...George Dutka

Saturday, 28 September 2013

Petersburgh Station - Model

The finished station rests on my workbench till I find a location to add it on the White River Division. The WRD is in the process of an upgrade.
 An Atlas station model is converted to a Rutland Ry. prototype

 I used the Bartonsville station as my main inspiration to build this model. I did choose Petersburgh as the station's name since that Rutland's station has the same lines as Bartonsville and was located near the B&M main line, one of the lines I model. Both stations reflect the look of the Atlas model to some degree and makes a good starting point for a model. Check out my two posts on Bartonsville and Petersburgh for photos of the prototype.

I used the walls and roof braces from the kit. The corners are glued together with Walthers Goo and corner braces are added to the walls and bay window. The body of the station is painted Floquil depot buff followed by a coat of Floquil grime. I applied the second coat while buff was still wet. This wall colour is what I currently am using for any structures that reflect the Rutland Ry. The station had a phone booth location that I did not use. I filled the holes and painted over that location so it blends in with the rest of the wall.

The walls are built up along with the new roof. The original Atlas roof is seen to the right of the concrete platform
Roof
For the roof I used heavy card stock which was braced as seen in the photos. I used the Atlas roof for basic dimensions. The seams are filled with MMD white putty then spray painted with an auto spray bomb. The roof material was purchased from Minuteman Scale Models at the Model Railroad Expo last year. He had a box of seconds that he was selling. I picked up enough light coloured slate to finish a roof of at least this size. The shingles are easy to apply, but you must take care cutting and trimming the edges. The roof got a weathering of Bragdon powders.

Windows, Doors and Platform
The kit windows and doors are used. These I painted Floquil coach green. They did get a light coat of chalk weathering to dirty them up a bit before adding to the station. The window and doors got a plastic glaze added which was sprayed with flat finish so they looked dulled down a bit. I used a brown paper bag cut into lengths for window shades.

The platform on the Rutland Ry stations I used as inspiration are gravel and cinders. I decided to reuse the concrete base that came with the Atlas kit. It looks really nice and can be a good drop in base when I change a location around. The base was painted Floquil concrete then chalks and powders are rubbed into the cracks and grooves. The base looks great and I am glad I used it.


The walls, windows, doors and concrete platform have all been painted and are now ready for a coating of Bragdon powders. The station roof has been spray painted black and will receive a slate roof.
Signs, Order Board and Details
The station sign was made by photocopying an original photo of the stations side. I did not even have to reduce the print size. In later years the station sign was moved to the roof top. I liked the looks of the sign hanging under the roof line as through most of the stations life. Once I cut out the station signs I rubbed a lead pencil along the edges to get rid of the white cut marks.

The station train order board was not in use near the end of its life...at least the photos I see has no blades on the post. I kind of wanted an order board included on my model so I built one and located it in the position it was found on the Petersburgh station. I had made a Rutland order board some years ago and I just copied what I did then. I will cover order board construction in a later post.

I added a lot of Juneco details around the platform for a well used location. I also used mostly Juneco figures in this scene. In real life the Rutland station platform was pretty empty in later years. I really like the looks of something happening on the platform.  Well now to find a new home for Petersburgh on the White River Division...George Dutka

The model is pretty much done at this point. I just have to finish the roof  and order board.
The shingles are being attached to the roof. I trim the ends and attach the cap after each side is finished.
A look at the rear wall of Petersburgh. The chimney is a cast metal casting from my parts box.
One of the ends are seen in this photo. The station sign is a copy of the original.


Sunday, 22 September 2013

Woodstock Model Railroad

A few weeks back Larry Brinker sent me a link to a new blog site he created to follow a local clubs layout construction. I have been checking it out regularly. Larry has done a good number of posts already (11 since Sept 4th) and the layout is moving along really quickly. They should be up and running trains in no time at all...you might want to check it out. The link is below and also in my sidebar...George Dutka

Woodstock Model Railroad

Saturday, 21 September 2013

Petersburgh, NY - Rutland Ry. Station

This view is of the station looking North. In earlier years the station sign was hung under the eaves. Bob Nimke collection.
Petersburgh - Mile 22.3

Petersburgh station on the Rutland Ry. was located 6 miles south of the B&M crossing at Petersburgh Jct.  I am not sure when the first station was built or removed but for a time prior to the station seen above (built 1903) there was a passenger car in use as the station. The station had a slate roof, a 10' by 150' gravel platform and a loading platform 16' long by 3'6" high on the north end. The loading platform was retired in 1933 but remained on the station till the end. The station sign at one point was silver leaf lettering on a black board. The station was retired in 1952.

The station dimensions vary depending on which site plan you look at. It was noted as 16' by 54' on one, 26' by 55' on another. The actual evaluation drawing of the station give it the dimensions of 16'4" by 60' with a wall height of 13'8" and ridge height of 20'6". The overhang is noted as 5'. The operators bay is 9'6" wide. The station evaluation indicates it as constructed using the 16' by 40 station plans. That would be Rutland's W-102 plan for a 16' by 40' or 22' by 55' station. It would originally have a white exterior and varnished interior.

Petersburgh did have a 651' siding, which was retired in 1939. In the early days a furniture factory was located behind the station. Just south of the station was a shirt factory and beyond that was the C.W. Reynolds coal shed.

A collection of Petersburgh station photos can be found at the link below...George Dutka

 Poulin Collection - Petersburg.pdf
 
Note the station signs at one time was attached to the roof. This photo would have been taken around 1951. Bob Nimke collection.


Friday, 20 September 2013

Tankcar-Covered Hopper - Sept 2013 RMC


In the Sept. 2013 issue of RMC I found an interesting article that converts a tank car to a covered hopper. The article reports that in 1948 Barrett Division needed covered hoppers to haul granulated slate from quarries on the Washington Branch of the D&H in Vermont to various roofing manufacturers. So cars are converted. A car like that might fit nicely into my own fleet. The model is built from a Tichy tank car. It does take some work converting, but one can do as much or little if need be to come up with their own version.

The decals for this project can be ordered through the link below. Jerry Glow also has some other interesting decals available. A word of advice...I did note that on the Yahoo groups pages I follow a mention that Jerry can be extremely slow in mailing orders out. One might wish to check with him before ordering...George Dutka
Custom Decals


Thursday, 19 September 2013

NEB&W Bartonsville Station

My station in progress is placed on top of the model photo built by Brent Chartrand.
I noted a link from the NEB&W Facebook page to my Petersburgh station blog post. I never knew who built the model for the club. It appears the NEB&W station was built by Brent Chartrand. He painted his model in NEB&W company's colours. Thanks for the inspiration Brent..George Dutka

Brent Chartrand's model on the NEB&W. The inspiration for my project. NEB&W Facebook page photo.
Rutland Ry., Bartonsville, Vt. station around 1947. Bob Nimke's collection. Brent used this prototype as inspiration for his model.

Friday, 13 September 2013

Petersburgh, NY Station Model

The finished model of my Petersburgh station. Although by my era the order board would have been gone and most of the station details would not have been there...it still was nice to include.
This past spring and summer I finally got started working on an Atlas station kit that I wanted to convert into a Rutland Ry. style station. This was a really easy project...not sure why I kept it in storage for decades. I first saw this conversion on the NEB&W as the Bartonsville station. John Nerich pointed this out to me many years ago. I chose another Rutland Ry. station that looked similar to the kit. Petersburgh, NY station was a smaller simple station that reflected what I wanted to do. It also was the first station south of Petersburgh Jct., a connection with the B&M on the corkscrew division. Petersburgh, NY would work well as a drop in style structure that could be located on the White River Division.

I will cover the prototype and construction of the station shortly...just thought I would pass along a few views from the finished model...George Dutka

Here is my station in progress placed on top of a photo of the same model on the NEB&W.

The station sign is a photocopy of the original sign. I added a lot of details around the concrete platform. The concrete platform included with the kit was really nice so I decided to use it. The original station platform was wooden and raised at one end at one point, then cinders near the end of its existence.

Monday, 9 September 2013

Plywood on the WRD

White River Junction is seen in the background with the foreground mainly removed. I have the station set aside for safe keeping till the foreground is set.
It has been a really long time since I have seen raw plywood on the White River Division. Seeing it gives me options for change. The best change so far is no duck under. With the tear down behind me I realise how my body is changing. A long afternoon back a few months ago began under the layout dismantling components that had to be removed before I could work up top. The next day I could hardly move. Who am I kidding I could hardly move while I was working under the layout...I think I should have built it higher up...more to come...George Dutka

This area was mainly hidden staging. The mountains and trees could be seen only as background or when one peeked over the foreground mountains. This will become the White River Junction yard. When I changed the layout shape the face board did not stretch all the way. I need to add a small filler piece at some point.

Friday, 6 September 2013

CNR Section House

The trackside and east end of the section house, June 2013.
With Central Vermont Ry. section houses a reflection of the parent CNR prototypes I thought I would share with you one that still exists near where I keep my boat. The CNR section house in Goderich, Ont. still remains but in poor shape. For the past few decades it has been part of the GEXR shortline owned by the same parent company as NECR or the old CV. These view might help one in the construction of such a structure...George Dutka

The roadside and west view back in 2010.